Wednesday, June 27, 2012

Greek Pasta Salad


Is it seriously the 4th of July in one week?

I'm not sure where summer is going, but I'll tell you one thing - I'm pretty bummed that July 4th is on a Wednesday.

This is not my freshman year of college, people.  I do not want to party in the middle of the week.  

Best-case scenario is when you get a three-day weekend with the holiday.  Second best would be at least a Tuesday or a Thursday, so you can take an extra day off and have a four-day weekend if you choose.

But a Wednesday?

Ugh.  What am I supposed to do with that?

Picnic & eat pasta salad?


Maybe... watch some fireworks?  And then it's basically BED TIME.  


Jeez.  It's difficult to properly celebrate America's independence when I have to get up the next day at 6AM.


But if the highlight of my holiday ends up being pasta salad, this is a good one to choose.


The homemade dressing is awesome, and with this recipe's method it doesn't all end up getting sucked into the pasta.  I also happen to love roasted red peppers, feta, and kalamata olives, so for me this is a no-brainer.  I bet diced cucumber would be great in this too.


Greek Pasta Salad

Dressing

  • 6 T. extra virgin olive oil
  • 3 T. red wine vinegar
  • 3 T. fresh lemon juice
  • 1 large shallot clove, minced
  • 1 T. Dijon mustard
  • 1/2 t. dried oregano
  • 1 t. salt
  • 1/4 t. garlic powder
  • 1/4 t. ground black pepper

Salad  

  • Salt
  • 1 pound farfalle (bowtie) pasta
  • 1 C. jarred roasted red peppers, chopped
  • 8 ounces crumbled feta cheese (about 2 cups)
  • 1 C. pitted kalamata olives (about 6 ounces), chopped coarse
  • 1/2 C. minced fresh parsley leaves


For the dressing, whisk all of the ingredients together in a medium bowl; set aside.

For the salad, bring 4 quarts of water to boil in a large pot. Stir in 1 tablespoon salt and the pasta, and cook until completely tender. Reserve 1 cup of the pasta cooking water, then drain the pasta in a colander. Transfer the hot pasta to a large bowl.

Stir the reserved pasta water into the dressing. Pour half of the dressing over the pasta and toss to coat. Stir in the roasted red pepper, feta, olives, and parsley.

To store, cover the pasta salad tightly with plastic wrap and poke several vent holes. Transfer the remaining dressing to an airtight container. Refrigerate the pasta salad and reserved dressing separately for up to 2 days.

To serve, shake the reserved dressing to recombine, then pour half of the dressing over the salad and toss to combine. Add the remaining dressing as needed to keep the salad moist.  Add more salt to taste, if necessary.

Recipe Adapted from Cooks' Illustrated

Monday, June 18, 2012

Black-Bottom Coconut Bars


Hope everyone had a wonderful Father's Day!  I know we did.

We had my dad and stepmom over for a cookout last night, and Saturday night we went to my in-laws for a barbecue.

My mother-in-law made a fabulous summer feast.... and all I had to do was bring a dessert!

Since my father-in-law loves chocolate and coconut, I decided to make something that's been on my Pinterest to-make list for a while- black-bottom coconut bars.

Everyone seemed to enjoy them.  As Mr. Vittles put it... it's basically "a brownie with coconut on top," but my mother-in-law pointed out that they were "a little more sophisticated than that."  Which is true - it's more like a brownie with a macaroon on top.

My brother-in-law, on the other hand, just liked saying the name.

Whatever floats your boat!


Black-Bottom Coconut Bars

Chocolate Base

  • 1/2 C. (1 stick) butter
  • 1/2 C. sugar
  • pinch salt
  • 1 large egg
  • 1/4 C.unsweetened cocoa powder
  • 1/4 C. all-purpose flour (spooned and leveled)
  • 1/3 C. dark chocolate chips

For Coconut Topping

  • 2 large eggs
  • 3/4 C. sugar
  • 1/2 t. vanilla extract
  • 1 C. all-purpose flour, (spooned and leveled)
  • 1 7-oz. package sweetened, shredded coconut, 1/2 cup reserved for sprinkling

For chocolate base: Preheat oven to 375 degrees. Line a 8-inch square baking pan with aluminum foil, leaving a slight overhang; grease bottom and sides of foil (not overhang).

Place butter in a large microwave-safe bowl; melt in microwave. Add sugar and salt; whisk to combine. Whisk in egg, then cocoa and flour until smooth. Mix in chocolate chips, and spread batter in prepared pan.

Bake just until sides begin to pull away from edges of pan, about 10 to 12 minutes (do not overbake). Let cool slightly while preparing coconut topping. Keep oven on for topping.

For coconut topping: In a medium bowl, whisk eggs with sugar and vanilla. Gently mix in flour and coconut (except 1/2 cup reserved for sprinkling).

Drop mounds of mixture over chocolate base; spread and pat in gently and evenly with moistened fingers or buttered spatula. Sprinkle with reserved 1/2 cup coconut.

Bake until golden and a toothpick inserted in center comes out with moist crumbs attached, 23 to 28 minutes. Cool completely in pan. Lift cake from pan, peel off foil, and cut into 16 bars.

Recipe Adapted from Martha Stewart, dicovered on Gonna Want Seconds

Monday, June 11, 2012

Flourless Peanut Butter Cookies


I can't believe this weekend is Father's Day already!  I am excited to spend it with all my "dads" - my father, step-father, and father-in law.

I am super lucky... they are all the greatest in their own way.

Mr. Vittles and I already bought gifts for my dad & father-in-law, but I still need to figure out what to make for my stepdad, Chris... he is an extremely mellow, quiet, 'surfer-dude' who doesn't care much for traditional gifts.

The gifts he likes best are homemade.

So here's a story for ya.  A little over a year ago, he was driving to one of his favorite surfing destinations when his roof rack came completely off his car, holding two of his favorite surfboards, and smashed onto the side of the highway.

He was naturally devastated - his boards are probably the only possessions he owns that he actually cares about.  Mr. Vittles offered to dispose of the pieces for him, and then secretly kept them in the garage for a project.

So for Chris' birthday this past March, we presented him with this amazing bench that Mr. V designed & made from the broken surfboards.


Chris was... ecstatic.


Now unfortunately for me... I do not have the talents my husband does, and I will not be crafting anything from wood to rival this gift.

But fortunately for me... Chris happens to love baked treats (even though he probably eats healthier than most people I know), and this fits more comfortably into my range of abilities.

Some of his favorite goodies are my mother-in-law's chocolate cake, ricotta cookies, and also good old-fashioned chocolate chip cookies.

He also loooves peanut butter - he puts it on everything.

Like... things that are totally inappropriate for slathering in peanut butter, such as tuna fish and meatloaf.

My personal favorite is when he makes giant, thick pancakes that take up the entire width of the frying pan, spreads peanut butter over the top, then adds tuna fish and honey.

Yeah... barf.

However, for all that peanut butter madness, he does not like baked goods with peanut butter in them.  Go figure!

It's ok though.  Because you know what that means?

More peanut butter cookies for me.


These are surprisingly yummy for not having any flour or butter in them... I used Natural Jif for these (the creamy natural kind, not the grainy natural kind that needs to be stirred) and the consistency is awesome.  Mr. V would probably prefer them a bit softer, but they're not crunchy either.

Maybe if I just added some tuna fish to the batter they would be a good candidate for this weekend?

Flourless Peanut Butter Cookies

1 C. creamy peanut butter
1/2 C. packed light brown sugar
1/2 C. granulated sugar
1 large egg
1 t. vanilla extract
1 t. baking soda
1/4 t. salt

Heat oven to 350° F. Line a baking sheet with parchment paper.

In a large bowl, mix together the peanut butter, sugars, eggs, vanilla, baking soda, and salt until smooth.

Shape the dough into 1" balls (you can use a cookie scoop - just mush back together if it cracks in half) and place cookies 2 inches apart onto prepared baking sheet. Using the tines of a fork, flatten each ball, creating a crisscross pattern.

Bake until puffed and golden, 10 to 12 minutes.  Let cool slightly on the baking sheets, then transfer to a wire rack to cool completely.  Makes about 2 dozen.

Recipe Adapted Slightly from Real Simple

Sunday, June 3, 2012

Raspberry Lemonade


Ok guys, I'm finally back, to make my (somewhat sheepish) return to the world of blogging.

Which is also a return to the world of internet, sadly.

Our internet provider, who shall remain nameless... but begins with a V and ends in an N... has royally screwed this loyal customer of 6 years and seems not to care.

We moved into our new house in early May, and despite numerous promises, breakings of self-imposed deadlines, and half-hearted apologies, we are still awaiting our phone and internet to be in complete working order.

Trust me, that is the very short and very diplomatic version of my sad tale.  However, since this is the most the internet has worked in over 3 weeks, I will take advantage!

It's all probably for the best that I took a little break, anyway, as Mr. Vittles and I have been busy little beavers.  The first weekend of May was spent moving, then the next unpacking & also celebrating mother's day.  The next was spent in upstate New York and Canada congratulating my brother-in-law Nick on his graduation from St. Lawrence University.  And the last was spent in the Virginia/DC area celebrating our friends T.J. and Adrienne's wedding.

Thankfully our two long weekends out of town were spent doing fun things.  But that much time away from the homefront didn't help our unpacking/settling momentum.... and certainly not my cooking/baking motivation, which in turn impacts the blogging.

You get the idea.

But... here we are.  And hopefully I'm back in action.

I have to ask one thing, though- how could it possibly be the first weekend of June already?

Despite what the calendar tells me, here at the Jersey Shore we know that the period between Memorial Day and Labor Day is the actual season of 'summer.'  So I thought it was time to make a nice summer refreshment - raspberry lemonade!

Mr V. took a sip of the finished product after warily eyeing the leftover raspberry & lemon pulp in the sink,  and looked genuinely surprised.

"Wow," he said.  "That's really good."

He took a second sip.  "Now I know what lemonade tastes like with real raspberries in it."

And it's true - this is soooo much better than the artificial raspberry taste you get with most lemonades on the market.  Nothing beats the fresh stuff!


Anyway - hope y'all are doing well, and I'm looking forward to getting into some more seasonal recipes with you soon!

I MISSED YOU!!

:-)

Raspberry Lemonade

  • 7-8 whole lemons
  • 3 1/2 C. cold water
  • One 6-oz. package fresh raspberries
  • 3/4 C. sugar
  • Ice (for serving)

Slice one of the lemons thinly, discarding the ends.  Set slices aside.

Juice the remaining whole lemons until you reach 1 C. of lemon juice. (By the way, hopefully you have a tool like this to help you get all the juice out of each lemon - trust me, simply squeezing a lemon half does not get that much juice out, and your hand will hurt to boot!)

Combine lemon juice with cold water in a pitcher or large bowl with a spout, and set aside.

In a smaller bowl, combine half of the lemon slices with the raspberries and sugar.  Using a potato masher (or a heavy, flat-bottomed item such as a wine bottle) muddle the fruits with the sugar until juices are released and sugar starts to dissolve.  Add muddled mixture to lemon/water mixture, and stir until sugar is completely dissolved.

Pour entire mixture through a sieve into a separate bowl or pitcher - discard the seeds, pulp, and lemon rinds.  (Keep in mind that the finer-mesh sieve you use for straining, the less chance there is of small seed and pup bits getting into your lemonade).

Serve lemonade chilled or over ice*, and garnish with remaining lemon slices.  Serves 3-4 people.

*Tip:  If you have additional raspberries, you can freeze them to use as ice so the lemonade doesn't get watered down.  Or you can use the already-frozen kind.

Recipe Adapted from Cook's Country

Wednesday, May 2, 2012

Pinteresting Recipes for Cinco de Mayo

OMG y'all, Mr. Vittles and I are officially HOME OWNERS!

And being as though most of my kitchen is in a box right now.... a new V&B recipe ain't happening this week.

:( :( :(

However... I perused my pinterest boards for some inspiring recipes for Cinco de Mayo.

I loooove me some Mexican food.  Unfortunately I won't be able to make any of these scrumptious goodies though, because I'll be moving.

Ugh.

UGH.

Somebody have a margarita for me, will ya?


Tuesday, April 24, 2012

Oatmeal Raisin Breakfast Bars


So I feel badly that I haven't posted in over a week, but the last seven days have been pretty interesting for us.

Between paying our income taxes (plus the accountant), paying off the first year of insurance for our new house, packing our belongings, dumpster diving for free cardboard boxes, and having my brain scrambled by the (extremely adorable & well-meaning) seller who tried to teach me about all her beautiful plants around the house.... it turns out I am not only poor, but also botanically-challenged, and incredibly tired.

(And... we haven't even had to sign away our life savings and our first-born child at closing yet.  That's next Monday.)

Sooo... needless to say I haven't spent much time in the kitchen lately.  But a few weeks ago I got a recipe from Mr. Vittles' aunt for 'granola bars' that are super yummy.  They are basically like oatmeal cookies, but without a leavening agent, and for breakfast.  

Raise your hand if you like cookies for breakfast?

(P.S. if you didn't raise your hand, I will forced to rethink our friendship.  Just sayin'.)

His little cousin actually made the ones we tried at their house, this is a good recipe for kids.  (BTW, she was also helping her mom make chocolate cake while we were visiting - definitely a girl after my own heart!)

Sadly my bars came out a little more dry than hers, I think maybe because I used whole wheat flour instead of all-purpose.  (I also added whole flax seeds, but that shouldn't really affect the moisture in the bars).  But they were still really good.  You can use whichever flour you prefer, or a mixture of both, and feel free to switch up the dried fruit too.  Just be sure to watch these carefully in the oven, because they do burn easily!


Oatmeal Raisin Breakfast Bars

  • 2 C. old fashioned oats (not the quick-cook kind)
  • 1 C. flour (all-purpose or whole wheat, or a mixture of both)
  • 3/4 C. brown sugar
  • 3/4 C. raisins (or other dried fruit of your choosing)
  • 1/2 C. wheat germ
  • 1/4 C. whole flax seeds
  • 3/4 t. salt
  • 3/4 t. cinnamon
  • 1/2 C. canola oil
  • 1/2 C. honey
  • 2 t. vanilla extract
  • 1 egg

Preheat oven to 350 degrees Fahrenheit, and cover a cookie sheet with parchment paper.  Set aside.

In a large bowl, mix together all dry ingredients (oats through cinnamon).  In a small bowl, whisk together canola oil, honey, vanilla, and egg.  Add to dry ingredients and mix with a spoon until evenly coated and well-combined. 

Then, with wet hands, place 5 clumps of the mixture on the cookie sheet and shape them slightly into even bars.  (This should use half your mixture - you will have about 10 bars total, depending on how large you make them).  Bake 18-20 minutes, watching carefully toward the end of the baking time so bars do not burn.  Cool briefly on pans then transfer to cooling rack to cool completely.  Repeat with remaining half of mixture.

Makes about 10 breakfast bars.

Adapted Slightly from Family Recipe

Sunday, April 15, 2012

Frozen Peanut Butter Cup Pie


It's in the low 70's outside right now, and the weather forecast for tomorrow tells me it's going to be 85 degrees.

So I think it's safe to say, summer is on it's way!

(So is global warming perhaps, because I don't know that I've ever seen such a warm winter in New Jersey?)

I love summer but the older I get, the more I hate being hot.

I hate being cold too - but at least you can put on sweatshirts and blankets.  There's no escaping oppressive heat.

Mr. Vittles and I have not lived in a house with good air conditioning probably since we both lived at our parents' house.  My first apartment after college (which was really more of a shed?) had one only window unit that I could barely afford to run anyway.  So my house was consistently in the upper 50s in winter and the 80s in summer.  Fun times.

Then our last apartment had central air... but little to no insulation.  So it really never got below the mid-70's at best.

In our place now, we have window units, but it's a large house and we were too cheap to buy a bunch of them - so we only had one for each floor of the house.

Sweat city.

Our new house that we're buying also does not have central air.  I think we're going to look into installing it, but we're not sure yet if that's going to be possible.

I sometimes wonder though how people lived before air conditioning.  Especially in warm climates.  I mean, even in the northeast we still get heat waves where the temperatures reach the upper 90s and lower 100s.

I guess you just get used to it?

Not me though.  Mr. Vittles always teases me that I have a very small window of comfortable temperatures. I think it's between 70 and 73, actually.  If our house is 65 degrees (which it usually is in the winter) then I'm freezing.  If it's 76 degrees in summer, I'm sweating.

Ridiculous, I know.

But there's nothing worse than having to turn on your oven when it's hot out.

So... with the prospect of summer brings the need for no-bake treats!


I saw a recipe on Confessions of A Cookbook Queen for Frozen Peanut Butter Butterfinger Pie and knew I had to save it for summer.

And... also make it immediately.

Just to, ummm, make sure it's good and all.

(Are you buying that excuse?)

In any event, I also knew that Mr. Vittles is not much of a fan of Butterfinger bars, so I figured peanut butter cups were a safer bet.  I also figured I'd throw some hot fudge in the mix for good measure.


This pie may give you cavities, but it will also make you (and your hot kitchen) very happy.  I promise.

Frozen Peanut Butter Cup Pie

  • One chocolate or Oreo Pre-made Pie Crust (6 oz.)
  • 8 oz block cream cheese, softened (I used 1/3 reduced fat from Philly)
  • 3/4 C. sweetened condensed milk
  • 1/2 cup creamy peanut butter
  • 1/4 cup powdered sugar
  • 8 oz tub Cool Whip, thawed (I used a light version)
  • 7 “snack size” Reese’s Peanut Butter Cups, chopped
  • 1/2 C. hot fudge topping (I used Hershey's Extra Dark)
  • Chocolate syrup, for decorative drizzling (optional)

In the bowl of a mixer, combine cream cheese, condensed milk, peanut butter, and powdered sugar.  Beat on medium speed until smooth and completely combined.

Using a rubber spatula, fold in the Cool Whip until combined.  Add chopped candy.

Pour hot fudge topping into bottom of crust (heat the fudge in microwave first if cold or too stiff).  Spread fudge evenly to cover bottom.

Pour peanut butter mixture into pie crust.  Drizzle top with chocolate syrup, if desired.  Cover and freeze until firm.

Adapted from Confessions of A Cookbook Queen

Friday, April 6, 2012

Coconut Patties


I don't know why these seem appropriate for Easter to me, but they do.

Maybe it's just because I love chocolate and coconut, so it seems appropriate for every occasion?

The only person I know who enjoys this combo as much as me is Mr. Vittles.  He doesn't usually get too excited about my treats, but coconut patties are one of his favorite things.

If you have ever taken a trip to Florida, you have probably seen these in airport gift shops and rest stops.

Mr. Vittles grandparents lived down there when he was growing up, so I'm assuming that's how he got introduced.  As for me, my mom's parents had a second home down there and I eventually went to college in Sarasota.

My dad and I used to make the trip to and from school together, so I could have my car on campus.

We always had grand plans for stopping along I-95 & I-75 to see some attractions, such as the Weeki Wachee mermaids.  But as the hours and miles ticked by (and it seemed more & more cramped inside my little 2-door Chevy Cavalier) my dad would inevitably get too impatient to make any side trips.

So after almost 4 years the only things we saw were some rest stops boasting 13-foot gators, this weird place called Alligator Town (where oddly enough we saw not one alligator, nor one other human being?) and South of the Border.

Which, judging by the myriad billboards along the highway, should have been way cooler.  Instead it was mostly disgusting and run-down and just overall tired.

Anyway... back to the coconut patties.  These bad boys are cavity-inducing, chocolate-covered sugar bombs.

But they are freakin' delicious.

Hope you all have a happy holiday!

Coconut Patties

  • 1 1/4 C. powdered sugar
  • 1/2 stick (4 T.) butter, cubed
  • 1 egg white
  • 1 1/4 cups sweetened shredded coconut
  • 1 t. vanilla extract
  • 1/2 t. coconut extract (optional)
  • 1 C. semi-sweet chocolate
  • 1 t. vegetable shortening

Fill a medium saucepan with an inch of water, and set it over medium heat to simmer.
In the bowl of a double boiler (or a heatproof bowl that fits snugly on top of your saucepan), combine the powdered sugar, butter, and egg white, and whisk together. Place the bowl over the saucepan of simmering water, and continue to heat and stir until the mixture is well-combined and very runny, about 5-10 minutes.

Remove the bowl from the heat and stir in the coconut, vanilla, and coconut extract (if using). Cover with plastic wrap, and refrigerate until it is firm enough to scoop, about 2 hours.

Once the candy has firmed up, line a baking sheet with waxed paper or nonstick aluminum foil. Using a teaspoon or small cookie scoop, scoop small balls of the coconut mixture and flatten them into discs between your palms.  Place the discs on the baking sheet, and place sheet in freezer while you prepare the melted chocolate.

Place the chocolate chips and shortening in a microwave-safe bowl and microwave until melted, stirring after every minute.

Remove baking sheet with discs from freezer.  Using a fork or dipping tools, dip the discs in the chocolate and drag the bottom against the lip of the bowl to remove excess chocolate. Place the dipped patty on the prepared baking sheet and repeat with remaining coconut candy and chocolate.

Place the dipped patties in the refrigerator to set the chocolate, about 20 minutes. Store coconut patties in a airtight container in the refrigerator for 1-2 weeks.

Recipe slightly adapted from About.com

Monday, April 2, 2012

Hazelnut Carmelitas


So call me crazy, but Pinterest is one of the best things that's ever happened to me.

To say that I'm obsessed with it is a serious understatement.  I have wasted spent hours upon hours on this website, scrolling through pins.  Salivating over delicious foods.  Simmering with jealousy over other people's fabulous sense of style.  Willing my pea brain to remember all the handy tips I've read.  And wishing I had more time to make all the neat crafts I've seen.

(In a more practical sense, I also love Pinterest because it has brought so many new visitors to my blog.  Yay! I like new friends!)

Now, I recently noticed a very popular Pinterest recipe, for Carmelitas from Lulu the Baker, that I have been dying to try.

I'm sure the original recipe is amazing, but I wanted to put a slightly different spin on it - so I added some Nutella and toasted hazelnuts.

Oh my word.  These things are dangerous.

My dad and stepmom had Mr. Vittles and I over for dinner, and we brought these for dessert.  My stepmom specifically asked to be quoted on V&B that she "thoroughly enjoyed" this dessert.  Which, might I add, is a lot coming from a person that doesn't much care for sweets.

My dad... well that's another story.  I only brought a few because they don't like to keep bad-for-you food in the house, but he quickly determined that the two leftover bars would definitely not be going home with us.

I did have a couple more left at our house though, so I brought one to my friend (and cube buddy) Joe at work.  He loves caramel, so I figured he would enjoy it.  It lasted until about 8:30AM on his desk, when I heard a muffled "These are amazing!" over my cubicle wall, amidst lots of chewing.
So please, do me a few favors.

One, get on Pinterest if you aren't already.  

And two, make some carmelitas.  Plain, hazelnut, whichever - just please make them!

I can't be the only one wearing pants with an elastic waist around here.

Hazelnut Carmelitas

  • 16 caramel squares, unwrapped
  • 1/3 cup heavy cream
  • 1/4 C. nutella spread
  • 3/4 cup butter, melted
  • 3/4 cup brown sugar, packed
  • 1 cup flour
  • 1 cup rolled oats
  • 1 teaspoon baking soda
  • 1 C. semisweet chocolate chips
  • 1/2 C. chopped hazelnuts (I recommend toasting them first, but that's up to you)

Preheat oven to 350 degrees Fahrenheit.  In a large bowl, combine melted butter, brown sugar, flour, oats, and baking soda. Pat half of the oatmeal mixture into the bottom of an 8x8" pan.  Bake in preheated oven for 10 minutes.

While crust is baking, melt caramel squares with heavy cream and nutella in saucepan over low heat.  Stir until melted & smooth.

Remove pan from oven and sprinkle chocolate chips and hazelnuts over baked crust. Pour caramel mixture evenly over pan. Crumble remaining oatmeal mixture over caramel. Return to oven and bake an additional 15-20 minutes, until the edges are lightly browned. Remove from oven and cool completely before cutting.*

*The original recipe says you can put these in the fridge to speed up cooling if you are short on time. The bars shouldn't be served cold, but the caramel takes a long time to cool down.  I would wait until they are cooled a little bit though first if you used a glass pan (don't want it to crack).  Bars should be stored and served at room temperature.  Mine were good for about 5 days in an airtight container.  Makes 1 8x8 square pan.

Recipe Adapted from Lulu the Baker

Saturday, March 24, 2012

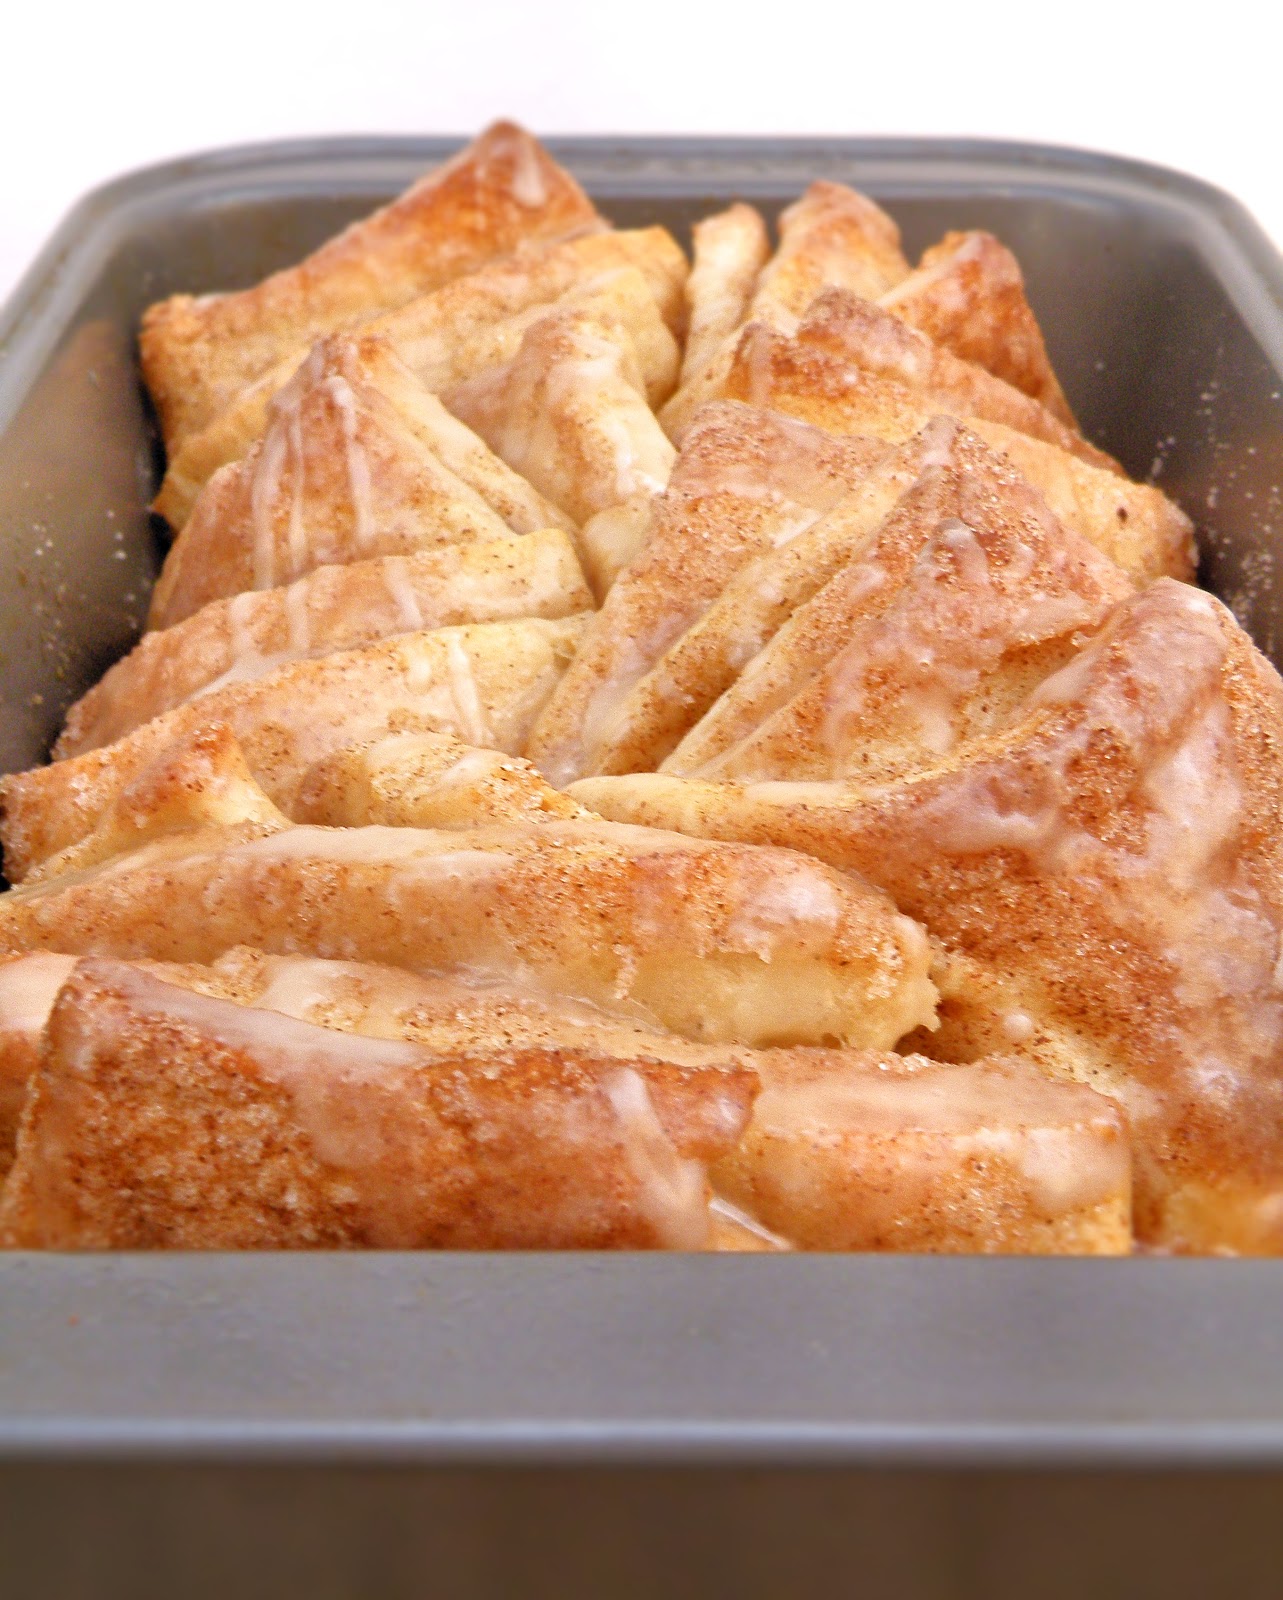
Overnight Pull-Apart Cinnamon Loaf


I was reading the April issue of Better Homes & Gardens when I came across this recipe.  

And there was no doubt in my mind that it would be part of my weekend menu.

I think my dough didn't rise as fully as it was supposed to... probably because the 'active' dry yeast was being lazy.

(Actually I believe it was because I didn't warm the milk enough to activate the yeast fully.  But it sounds better to blame lazy yeast than myself.)

Anyway, a half-risen dough ball meant I didn't have as big of a rolled-out rectangle as I was supposed to.  So then the stacked rectangles seemed too puny for the loaf pan.

But despite these issues, my loaf ended up filling out rather nicely while baking, and the smell in the house was incredible.   And the taste did not disappoint either - this was soooo delicious!

It's a perfect combo of sweet, sticky, soft & pillowy, and with a little crunch on top.

Mmmm.


What's also nice is that you can start the recipe the night before, let the dough rise overnight in the fridge, and finish it the next morning to cut down on the wait time.

Mr. Vittles had to give an estimate for a job this morning, and my loaf was done a little while before he came home.  Which worked out well because I could take my photos without any of his usual teasing... but I must admit, being left alone with this loaf was almost deadly for my waistline.

I seriously considered eating the whole thing and telling Mr. V that it got ruined and I had to throw it away.  

But luckily I got a hold of my self-control, and he came home a few minutes later anyway ;)

So be warned - make sure you are not left with this unsupervised!

Overnight Pull-Apart Cinnamon Loaf

Dough:
  • 3/4 C. milk
  • 1 package active dry yeast
  • 1/4 C. (4 T.) butter, melted
  • 2 T. granulated sugar
  • 1 egg, lightly beaten
  • 1/2 t. salt
  • 2 1/2 C. all-purpose flour 
  • 1/2 C. whole wheat flour (or more all-purpose flour)

Filling:
  • 1/4 C. (4 T.) butter, melted
  • 3/4 C. granulated sugar
  • 2 t. ground cinnamon

Glaze:
  • 1/2 C. powdered sugar
  • 1/2 t. vanilla
  • 1 - 2 T. milk (however much is needed to achieve pourable consistency)

Make dough:  In a microwave-safe measuring cup, heat the milk until just warm (105 to 115 degrees F).  Pour into large bowl of a stand mixer, then add the yeast.  Stir until yeast is dissolved.  Let stand 5 minutes or until foamy.

In small bowl, combine flours & set aside.  With a mixer, beat 1/4 cup melted butter, 2 tablespoons sugar, egg, and salt into the yeast mixture until combined. Add half the flour (1 1/2 cups), then beat on low for 30 seconds, scraping bowl as needed.  Increase speed to medium and beat 3 minutes more.  Stir in remaining flour. 

Shape into a ball (dough will not be smooth).  Transfer dough to an oiled bowl, and cover top of dough with a little more oil. Cover and refrigerate overnight, or up to 2 days. (Or, to make right away, cover and set in a warm place to rise for 45 to 60 minutes or until nearly double).

Grease a 9x5x3-inch loaf pan; set aside.  Remove dough from the refrigerator.  On a lightly floured surface, roll dough to 20x12-inch rectangle (or as close to it as possible).  Brush surface of dough with 1/4 cup melted butter, then sprinkle with the mixture of sugar and cinnamon (I actually ended up not using all the cinnamon sugar, but it's up to you).  

Cut the dough rectangle crosswise in five equal strips:
Stack strips on top of each other, then cut the stack into six pieces.  
You will now have 6 stacks of five rectangles.  Leave the stacks intact, and turn stacks on their side (cut sides up).  Place the pan lengthwise (so the short side is facing you) and loosely stagger pieces, diagonally, in pan. 


Coat top with any leftover butter and cinnamon sugar.

Let rise in a warm place for about 30 to 45 minutes. Meanwhile, preheat oven to 350 degrees F. 

Bake loaf about 30 minutes or until golden brown.  Place pan on wire rack to cool.  (Here you can either let the loaf cool 10 minutes, and then take out of pan & place on serving plate to glaze. OR you can glaze it immediately, while it's still in the pan, for a more informal serving. I did the latter, and just pulled the pieces right out of the pan.  Depends on your preference!)  Make glaze:  In a small bowl or measuring cup, stir together powdered sugar, vanilla, and enough milk to make a glaze of drizzling consistency.  Pour glaze over top of loaf.  I would recommend eating while it's still warm, but you can also let cool before serving.  Makes 8-10 servings.

Recipe Slightly Adapted from Better Homes & Gardens

Sunday, March 18, 2012

Irish Cream Mocha Fudge


Happy belated St. Patrick's Day, everyone!

I would have liked to post this before the holiday, but this past week really got away from me!

I made this fudge on Friday night for a party we went to yesterday in NYC.

In the spirit of starting festivities early, some of Mr. Vittles' friends hosted a brunch... in their amazing apartment that has not one but three decks.  It turned out to be a beautiful day, so we were able to spend a lot of time outside.

But since we wanted to take the train into New York, which takes about an hour & 45 minutes from our house, we had to be on the train by 7:50AM.

Usually on a Saturday morning, I am not even awake yet at that time.   (I get up at 6:15AM on weekdays for work though - don't worry, I'm not a total bum).  And to make matters worse, I overslept because I set my alarm incorrectly, so I was rushing and had no time for coffee or food.  The foggy weather here yesterday morning was not helping me pep up, either.  So I would have liked nothing more than to take a little nap on the way up to NYC... but I quickly found out that was not in the cards.

The train was filled with young (mostly college-aged) people, all decked out in green, I guess heading into the city for the St. Patrick's Day parade.  NJ Transit allows people to drink on the train, so they were already getting rowdy.  About twenty minutes into the trip it was already standing-room only.  On our particular car, there was a girl who was apparently having a birthday, and we must have heard the song "Happy Birthday" about ten times over the duration of the trip.  Not to mention other songs ("99 Bottles of Beer on the Wall"), various screams and chants, and also lots of banging on the roof of the train car.

My dad warned me from experience that the "drunk train" was going to be interesting.  But we were expecting that to be at night, not at 8 in the morning.

Surprisingly the train ride home around 5PM was much calmer.  I think at that point people were exhausted from drinking all day and ready for a nap.  Luckily, that early in the evening we were with either the lightweights or the smart people who had enough sense to call it quits - not the heavyweights, or ones that were forced by their friends to rally for the good of the group, and would likely end up spending more time in the bathroom than their seats.

If they even made it that far.

...

Yucky.

So anyway, St. Patty's Day is not one of my favorite holidays (mainly for the above reasons).  But we had a great time at the party, and hopefully everyone enjoyed the fudge.


It has loads of sugar, so it at least got the Mr. Vittles seal of approval!

Irish Cream Mocha Fudge

  • 1/3 C. Irish cream (such as Bailey's)
  • 1 T. instant coffee granules
  • 3/4 C. (1 1/2 sticks) butter
  • 1 7-oz. jar marshmallow cream
  • 3 C. sugar
  • 1/2 C. evaporated milk
  • 1 12-oz. bag milk chocolate chips
  • 1/2 C. semi-sweet chocolate chips
  • dash salt
  • 1 t. vanilla

Line a 9x13" pan with foil, and grease with nonstick cooking spray.  Combine milk and semi-sweet chocolate chips with salt in a large heatproof bowl & set aside.

Combine Irish cream with instant coffee in a small, microwave-safe bowl or measuring cup.  Microwave 20 seconds (more if needed) and stir to dissolve coffee granules.  Set aside.

In large saucepan over medium heat, combine butter, marshmallow creme, sugar, and evaporated milk, stirring until melted.  Slowly add irish cream mixture and bring to a simmer, stirring frequently, about 5 minutes.  (Reduce heat if mixture starts to burn).

Pour mixture over chocolate chips, and add vanilla.  Stir until mixture is smooth and creamy.  Pour into prepared pan and smooth evenly to sides.  Let chill in refrigerator until set, then cut into 1" squares.  Can be kept at room temperature, or in refrigerator if desired.  Makes one 9x13 pan of fudge.

Recipe Adapted from Justapinch.com

Sunday, March 11, 2012

Baked Zucchini Chips


Well I said last week that I'd probably be up to my old tricks by now.

But much to my own surprise, I decided to try another 'healthy' recipe I've been thinking about - zucchini chips!

If you ever look at the sidebar of my blog that lists 'popular recipes' you will see that Apple Chips are number one.

They have been for a while now, but the funny part is that they are number one by a landslide.

Mr. Vittles occasionally looks over my shoulder while I'm reviewing my blog's stats, and he is always so amused by the fact that the Apple Chips completely dwarf every other post.

This fact is absurdly evident by a bar graph that shows the top 10 posts' all-time number of views... basically one long bar, with a whole bunch of short ones beneath it.

Up until this week (when Cheesy Bacon Oven Chips suddenly blew up on Pinterest) the Apple Chips had four times more views than the 2nd most popular post.

So... in light of people's apparent interest in this recipe, Mr. V decided that I need to make chips out of something else.

And the next, most logical thing that came to my mind was zucchini.


To me, these chips taste kinda like thin & crispy pumpkin seeds.  (I guess that shouldn't be too much of a surprise since they are relatives in the squash family).  Much lighter, but the taste is similar.

And the seasoning possibilities are endless - you can tailor them to your liking.  Garlic, paprika, chili powder... use your imagination!  I went with a basic Seasoned Salt and they came out great.  But whatever you choose, just make sure you go easy on the seasonings, and only use a little bit - these do shrink a lot in the oven, so what looks like a reasonable amount on the raw veggies could turn out to be way too much!


Baked Zucchini Chips

  • 1 zucchini 
  • canola cooking spray
  • seasoned salt, or other seasoning(s) of your choice

Preheat oven to 225 degrees Fahrenheit.  Line a baking sheet with parchment paper or nonstick foil, and spray with canola oil.  Set aside.

Slice zucchini into thin medallions, about the thickness of a quarter.  (You can either use a knife & a very steady hand, or a mandoline slicer.)

Lay out slices on prepared baking sheet, and spray tops lightly with additional cooking spray.  Sprinkle with seasonings of your choice. (A note on seasoning, however - use LESS than what seems appropriate.  These shrink considerably in the oven, and if you use too much it gets very concentrated.  It's better to end up underseasoning and add more later.)

Place in preheated oven and bake 45 minutes.  Rotate baking sheet, and bake an additional 30-50 minutes, until chips are browned and crisped to your liking.  These are best eaten within a couple hours of removing from the oven, as they start to get chewy if left out.  One zucchini makes one serving (1/4 C. - 1/3 C. of chips depending on the size of your squash).

Original Recipe

LinkWithin

Related Posts Plugin for WordPress, Blogger...