Showing posts with label holiday. Show all posts

Sunday, June 22, 2014

Red White & Blue Mini Vanilla Cheesecakes


Strawberries have always been one of my favorite things about summer.

Much like my obsession with pumpkin in the fall, we always have plenty of strawberries on hand during the summer.  I look for any excuse to eat them or use them in recipes!

Now it seems our Mini has inherited this love as well, except she refers to them as "strawbees."

Not long ago she went strawbee picking with some of her cousins, and apparently took her job very seriously.


I was also told that she did not eat one single, solitary strawberry while they were at the orchard!

She made up for it at home of course, but I was still able to snag a few to adorn these mini cheesecakes.

I am loving this recipe because you get to enjoy the creamy richness of a cheesecake without having to deal with the fickleness of baking one that's full-sized.


And... you get to cover them with blueberries and "strawbees" (or any other fruit of your choice.)  But of course, I love the red, white & blue theme for the 4th of July!

Red, White, & Blue Mini Vanilla Cheesecakes

  • 1 1/2 C. graham cracker crumbs
  • 5 T. melted butter
  • 3 T. sugar
  • Pinch salt
  • 2 (8-oz. packages) cream cheese*, room temperature
  • 2/3 C. sugar
  • 1 vanilla bean, split and seeded
  • 2 eggs, room temperature
  • 2 t. pure vanilla extract
  • Sliced strawberries & blueberries, for decoration

Preheat oven to 325°F. Line one 12-cup muffin tin with paper liners.**

Mix together graham cracker crumbs, melted butter, 3 T. sugar, and salt. Place 2 tablespoons of the graham cracker mixture into bottom of paper liners. Using the bottom of a small juice glass or your hands, press mixture down firmly into each cup.

Using electric mixer, beat cream cheese, 2/3 C. sugar, and vanilla bean scrapings until light and fluffy. Add eggs and vanilla extract, and beat well.

Divide batter evenly amongst cups (each should be about 3/4 full). Bake for 22 to 24 minutes, or until the centers are just set. Cool in pan on wire rack, then transfer to plate and chill for 4 hours or overnight in an airtight container.

Before serving, top with sliced strawberries & whole blueberries.  Makes 12 cupcakes.  Cupcakes are good for 3-5 days when refrigerated.

Notes:
*You can substitute Neufchâtel for some or all of the cream cheese, that is what I used for a slightly lower fat version.
**I really like the Reynolds StayBrite® baking cups (available in most grocery stores) for these, because they are thick and peel away from the cheesecakes easily.

Recipe Adapted Slightly from Bree at goboldwithbutter.com

Sunday, December 22, 2013

Cranberry Sangria


This year I thought I was really on top of things, and then it happened.

Christmas totally snuck up on me!

I don't know if it was because Thanksgiving was so late, but I feel like it is way too soon for the holiday to be upon us.  How is it only 3 days away?

I'm thinking this whole working thing is really starting to get in the way of my personal life.  Too bad I only have, oh, about 40 more years to go.

Speaking of work, last weekend I hosted a brunch with my girlfriends from my first job out of college.  Hard to believe that was almost 9 years ago already!  We try to get together at least once a year around the holidays, and if possible once in the summer.

The weather was, shall we say festive... a pretty dusting of snow, that held off enough to allow for their safe travel from New York and North Jersey.  We enjoyed a nice spread of coffee cake, pumpkin muffins, quiche, maple-coated bacon, and chopped greek salad.  Not to mention cranberry sangria.

I'm not a big drinker but I am usually a sucker for  a good margarita, and a good glass of sangria.  I like that this one had cranberry for the holiday.  Not too sweet or heavy, but it will still put a little jingle in your bells.

I totally could have used a glass (or three) of this a few weeks ago, when I was trying to get a photo of Mini for our family Christmas card.

This child does not sit still - not for one second.  True definition of "Ants in the Pants."

I need one of those high-speed cameras just to have a prayer of getting a shot that is not a complete blur.

Somehow I managed to capture a few gems - but it certainly wasn't easy!


In any event, amidst all the craziness that often accompanies this season, I hope you can take some time to relax (preferably, with a glass of cranberry sangria.)  Whatever you do - please, please, please just enjoy your holidays!!

Cranberry Sangria

  • 1 bottle (750mL) dry red wine
  • 1 C. cranberry juice
  • 1 C. orange juice
  • 1/4 C. brandy
  • 1/3 C. Triple Sec
  • 1 orange, thinly sliced
  • 1 lime, thinly sliced
  • 1/3 C. fresh cranberries, some crushed

Combine all liquid ingredients in a large glass pitcher.  Add fruit.  Chill 2-8 hours before serving.

Recipe Adapted from the Editors of Publications International, Ltd..  "Cranberry Sangría"  31 August 2006.  HowStuffWorks.com.

Monday, December 3, 2012

Red & Green Striped Sugar Cookies (and a Giveaway!)


Is it seriously December already?

Time is flying, I can't believe my little munchkin is almost 6 weeks old & I feel like she has already changed so much!


Living up to her nickname of Mini Smalls, so far she takes after her mommy in a few regards.  For one, she likes her sleep.  (Sadly, she enjoys sleeping in the day a little more than the night, but hey it's a work in progress).  

Two, she loves to eat!  She was a peanut at birth but now (as my brother-in-law would say) she's getting her 'man weight.'  At her 4-week checkup, she was up to 9 pounds and 21 inches.  The pediatrician actually told us we can't let her eat so much at each feeding- ha!  When she's awake, all she wants to do is eat and even when she's asleep you can tell by her mouth movements she's dreaming about eating.

Ugh, truly a girl after my own heart.

Now if only she could have solid foods, I bet she would LOVE these sugar cookies with her milk.  (Santa would probably love them too.  Just sayin'.) 

Which brings me to my next point - I am excited to introduce my second promised guest, Amy of Yummi Yogi   We have actually never met in person, but she is a friend of a friend of a friend (!) who contacted me a couple months ago about doing a giveaway on V&B.

Yummi Yogi is company that makes cookie cutters in the shape of yoga poses - so cute, right?


Call me a nerd, but to me this is one of the coolest things about blogging.  You get to 'meet' so many amazing & interesting people that you might not have otherwise come in contact with!

Anyway, not only was Amy kind enough to giveaway of one of her designs to a lucky V&B reader, she also shared her recipe for these super fun striped sugar cookies AND a peek into her life via the interview below.  

Please check out her online shop for any yoga (and baking!) lovers on your Christmas gift list.  Or maybe for yourself... don't be shy now ;)

To enter the cookie cutter giveaway-- now through December 16, 2012, just leave a comment on this post telling me your favorite holiday recipe or tradition.  I will randomly choose a winning comment, and that person will receive one of Amy's adorable cookie cutters!  Easy peasy! (Please  just make sure there's a way for me to contact you in your comment in the event you are the winner.)

Interview with Amy from Yummi Yogi

Please tell us a little bit about your family and the area where you live.
I have a beautiful new 10 month old baby girl, Elle Ruby and I married my soul mate, Dennis but I call him Dube (Doobie) which is our last name. (long time nick name for him) We reside along the coast of NJ. I love our area and to be able to see the water everyday if we choose to is so refreshing. Especially in the summer for beach yoga :)

How did you get started doing yoga, and how long have you been practicing?
I started yoga over 5 years ago searching for more activities to do after the company I was working for closed down. I was familiar with yoga from my childhood friends growing up but never practiced when I was younger. I thought I would try different classes at my club/gym and after I walked into my first yoga class I never stopped! 

What do you enjoy most about the hobby?
I feel very connected to yoga and love how it encompasses your mind and body off the mat as well. It is challenging which I like and it helps me stay focused. There’s always something new to learn that is why it is called a practice, it will never be perfect and I love that. You can express yourself on the matt and let your mind go which is not easy for a lot of people to do. I wish everyone can experience it. And I’ve met some really amazing people through yoga.

What were some of the things that were most important to you to include in your business model? 
I not only want to reach yoga studios with this product but to be able to grow the business into health food markets as I really enjoy the life style of healthy eating/living and also to children. Both through kids yoga schools/groups etc., and also with kids eating healthy, very important to me!
I am also interested in helping my retailers grow their business. So I provide a free marketing service to them. I try to provide merchandising ideas for selling the cutters and also help promote their business events etc., through my platform of social media. I am a small business and hope to help other small business grow too. 

What advice would you give to someone interested in starting their own business?
That it is possible! I believe organization is a key factor to being successful. Take your time, think everything through and go for it! If you have a true passion for something you won’t mind putting the time and energy into your business because it is so rewarding.

What are some of the biggest challenges of being a business owner?  Most rewarding aspects?
For me at this stage in my career, it is the time management now that I am also a mom and have my own business. I have a strong support system with my family that I am grateful for but it is very challenging! I love what I do and I also love being a mom :)

The reward from a business aspect is that I am proud of myself that I have come this far and that I am positive about what the future holds for Yummi Yogi. Each day I grow and learn more and more. I love that the customers & followers really respond positively to what I am doing which makes me happy as well. I also love that I can be creative with the cookies and also from the marketing perspective too. I do every part of my business from designing the cutters, assembling the cutters, to slapping on the shipping labels and also marketing my business and creating the website.

How did you become interested in cooking/baking, and which do you prefer?
I love to cook and explore all types of styles. My favorite is Indian. I don’t eat meat but do eat fish on occasion. Baking is something that I have grown up with especially during the holidays, it is tradition to make a plethora of cookies and give them away as gifts. I like to bake because I can be creative in a visual way with decorating etc., however cooking is being creative with your ingredients which is fun too!

Where do you like to go to find inspiration on recipes and different ways to use your products?
I love to see what others are coming up with in the kitchen. For cooking I usually take bits and pieces of different recipes and mold them into my own. For baking, I don’t always look at baking recipes but just seasonal inspirations and then try to incorporate it into using the cookie cutters, like the corn bread and chilli for example. I love pinterest and food blogs for ideas too.

What are some of your family’s favorite holiday traditions & foods?
I grew up with both my parents having polish parents so there was a lot of pierogies and cabbage! At Easter we always would dye eggs and before our Easter Brunch everyone at the table would take a decorated egg out of the basket and usually one of the kids starts by turning to their neighbor and “bang” eggs. Who’s ever egg got cracked loses that round. And it continues around until there is a winner or crackless egg :) We still do this today. 

Christmas was all about the cookies! From Kruscyki’s to anise cookies to name a few.

I hope to carry on my family traditions and also create a few new ones of our own too. I think it’s important for the kids to have that and now as an adult I really appreciate it. 

Thank you to Amy for sharing her story & talent with us!  Now... get to commenting so you can win one of these cuties for yourself!

Striped Sugar Cookies
  • 1 lb butter, at room temperature
  • 1 1/3 C. sugar
  • 5 C. sifted flour
  • 2 t. vanilla
  • 2 eggs
  • red & green food coloring
Cream butter and sugar together.  Add eggs one at a time, then vanilla & mix well.  On low speed, add one cup of flour at a time & mix until incorporated.

Divide dough in half and place into 2 bowls.  Mix green food coloring into one bowl to desired shade.  Mix  red food coloring into other bowl to desired shade.  Wrap each ball of dough in plastic and flatten with a rolling pin.  Refrigerate for 2 hours, then preheat oven to 350 degrees F.

Place a new piece of saran wrap on a flat surface.Cut a 1”x 6” strip of red dough and place on the new piece of saran wrap. Repeat with green dough and place green strip next to red strip. Continue this process until there is enough dough to fit a Yummi Yogi™ cookie cutter. (Approx. 5” x 5”).  Gently roll dough again to join strips, then place dough in freezer 5 minutes.

Cut dough with cookie cutter and transfer to a greased cookie sheet or a non-stick baking mat. Gently press dough out of cookie cutter onto sheet and bake in preheated oven 10-14 minutes.  Cool briefly on sheets, then transfer to wire racks to cool completely.   

Family Recipe & Cookie Photos Courtesy of Amy Dube, Yummi Yogi™

*Note:  I did not receive any compensation for this post, only one product to give away.  All opinions are my own.

Saturday, January 7, 2012

“Magic” Peppermint Ice Cream


The time of year after the holidays can get annoying.  Is anyone with me on this?

I hate going back to work after having all this time off (especially in a year like 2011 was, where Christmas & New Years fall on a Sunday and most people get Monday off).

I hate taking down Christmas decorations.

I hate that I always put last year when I write the date.

I hate hearing people's New Year's resolutions, especially when they get all crazy like, "Oh, I resolved not to eat chocolate any more, and run 5 miles a day."

Ummm... good luck with that.

And you know what else I hate (that's actually completely unrelated, but equally annoying)?

When bloggers post incredible-looking recipes that require specialized equipment that I don't own.

And then I have to go out and buy things like a mandoline sliceran ice cream machine, and a donut pan, and then I can't fit all this #%*& into my kitchen anymore, and HOW DARE YOU brainwash me with these delicious treats?

{sigh}

But I am totally guilty of this myself.  Red Velvet Ice Cream.  Apple Chips.  Mini Baked Apple Cider Donuts.  Oatmeal Chocolate Chunk Ice Cream....

...ok ok, I know, sorry!

There's still more that belong on that list - and we all know I probably won't stop there.

Sooo... I will try to make up for it (just a little bit) right now.

This ice cream is magic because you don't need an ice cream maker!

And even if you have an ice cream machine, you may still want to try this because this method is a) way easier and b) pretty cool.  The ice cream comes out rich & creamy, and very scoopable even after days in the freezer.

By the way, for all you white-chocolate haters out there, worry not.  I'm not entirely sure why there is an ounce of white chocolate in the original recipe ... probably to do with the texture or a slight upgrade in taste?  But in no way does this ice cream taste like white chocolate, so don't be deterred by that.

P.S. - the reason why I made peppermint ice cream in the first place is because I saw this 'peppermint punch' on Pinterest and instead of eggnog someone suggested pouring ginger ale and Bailey's over the ice cream! Haven't tried it yet but I am definitely going to :)

“Magic” Peppermint Ice Cream

  • 1/2 C. sweetened condensed milk
  • 1 oz. white chocolate, chopped fine (or you can use white chocolate chips)
  • 1 1/2 t. peppermint extract
  • 1 1/2 t. vanilla extract
  • Pinch salt 
  • couple drops of red food coloring (optional)
  • 1/4 C. sour cream
  • 1 1/4 C. cold heavy cream

Microwave sweetened condensed milk and white chocolate in large bowl until chocolate melts, stirring halfway, in 30-second intervals.  Let cool.  Stir in peppermint, vanilla, salt, red food coloring (if using) and sour cream.

With electric mixer on medium-high speed, whip heavy cream to soft peaks, about 2 minutes.  Whisk one-third of whipped cream into white chocolate mixture.  Fold remaining whipped cream into white chocolate mixture until incorporated.  Mixture will be very light & airy.

Place in airtight container and freeze until firm, at least 6 hours or up to 2 weeks.  Serve.  Makes about 1 quart.

Recipe Adapted from Cooks Country

Friday, December 30, 2011

Gingerbread Coffee Creamer


Did everyone have a nice holiday?

I certainly did.  It was busy but lots of fun.

Last Friday we went up to visit my aunt Jody and her family.  Then Christmas Eve was spent with my dad & stepmom.


We went to her brother's house for Christmas Eve, where Pappy Vittles battled my little cousin Michelle in a vicious game of... tops?


My dad nicknamed his The Wild Weasel.

They also decided to bet on the game, and after so many "double or nothings," Michelle was in the hole about $10K - until she finally managed to beat The Wild Weasel and zero out her debts.

(Thank goodness for that.  She might have had to tap into her college fund before the end of the night!)

Then we spent Christmas Day with my in-laws, and ate a delicious roast beef dinner at Nana Vittles' house.

The highlights of my day included receiving The Booty Pop from my brother-in-law (in retaliation for giving him fart-filtering underwear last year) and winning the family beer pong tournament with Mr. Vittles on Christmas night.

You may not recall, but last year's tournament included cat-dancing and wearing fake mustaches... this year we got to wear fake noses also.


I would say a glorious holiday was had by all.

Although, I never thought I would say this, but at this point I'm soooo sick of eating.

My pants are pretty sick of it too.  Mr. Vittles may have to roll me to work next week in the event that I don't fit into my car.

But there's still time to enjoy the holiday flavor of gingerbread ... and without having to consume a single cookie.

If you're like me, coffee is a must, so why not make it festive?

Do it while you still can, before you're mentally done with gingerbread until next December.

Happy, healthy 2012 to all!

Gingerbread Coffee Creamer

  • 1/2 C. milk
  • 1/2 C. heavy cream
  • 2 T. molasses
  • 1/2 t. ground ginger
  • 1/2 t. ground cinnamon
  • 1/4 t. cloves
  • 1 t. vanilla extract

Whisk together milk, cream, molasses, ginger, cinnamon, and cloves in medium saucepan over medium heat.  When mixture begins to steam, remove from heat.  Stir in vanilla extract.  Strain mixture through a fine mesh sieve and store in refrigerator, up to 10 days.  Makes about 1 cup.

Adapted from Deliciously Organic 

Friday, December 23, 2011

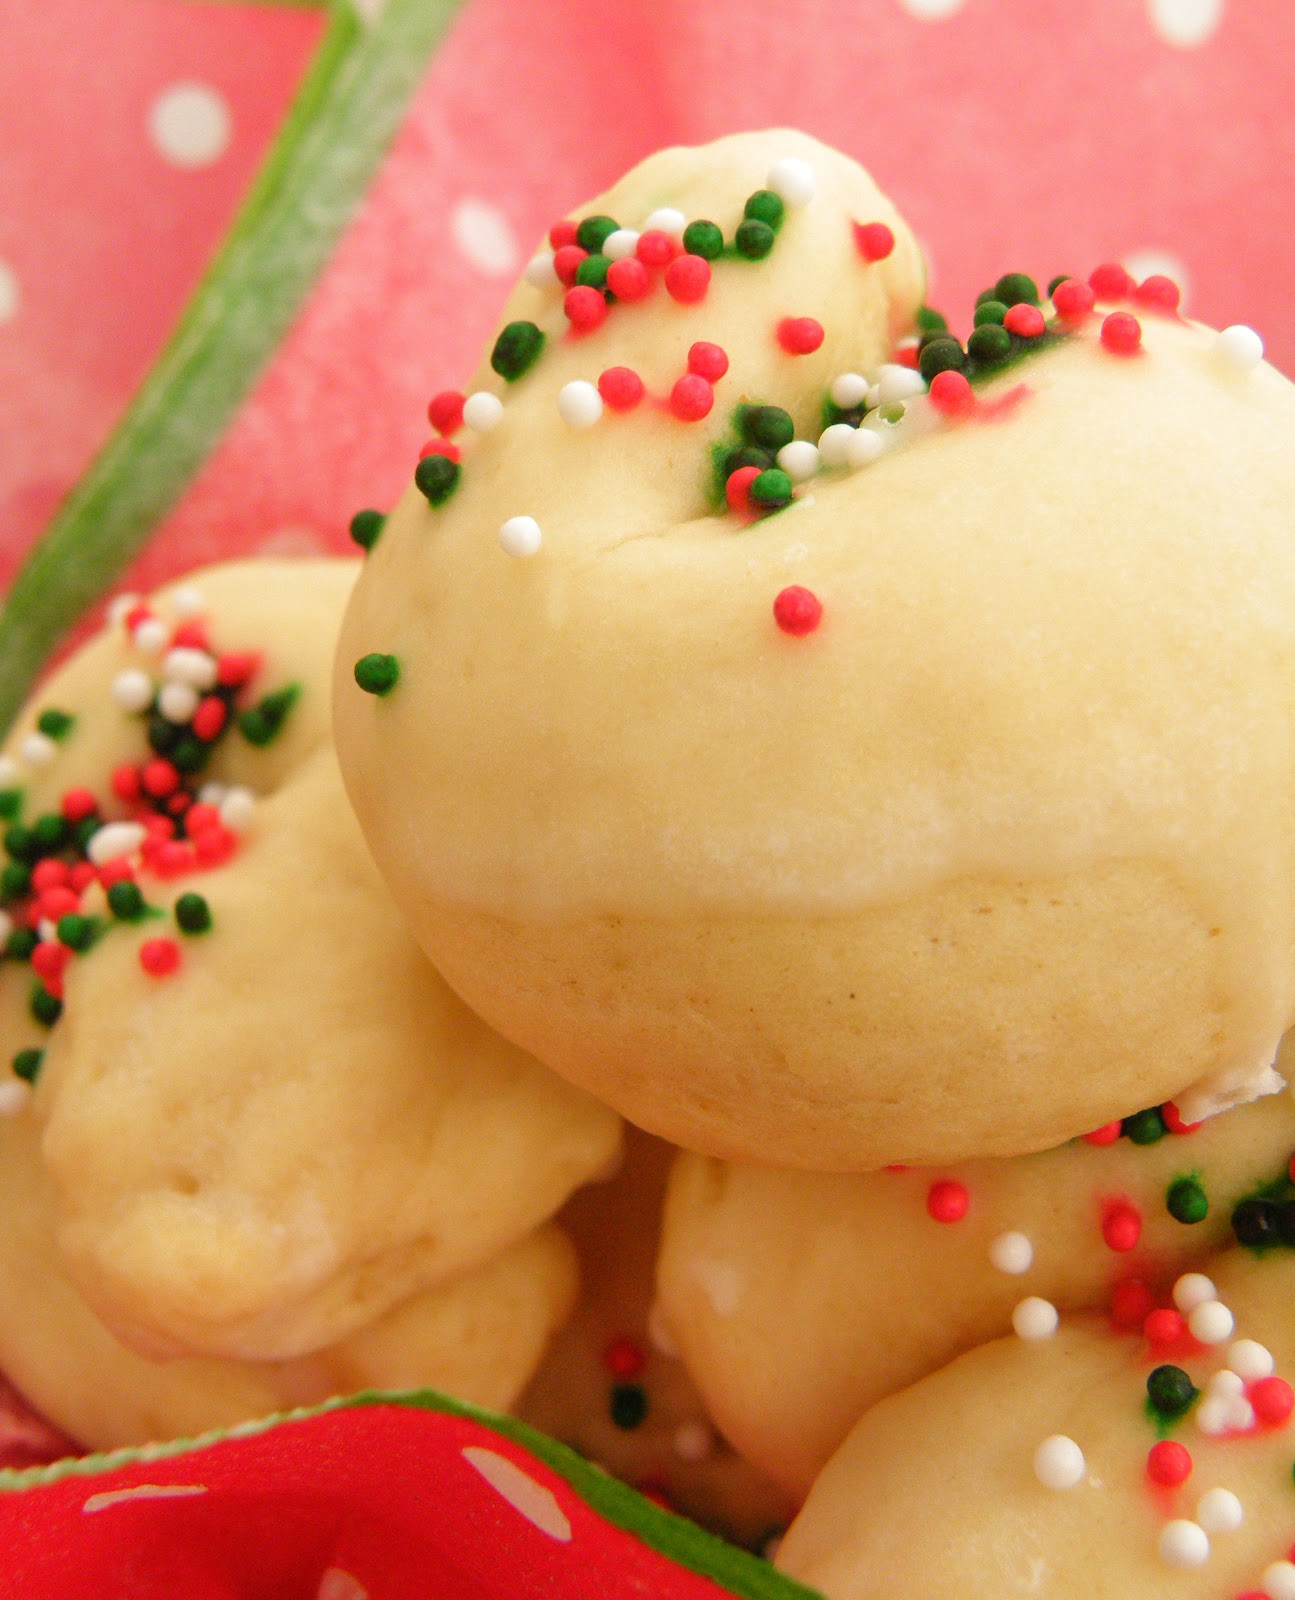
Italian Knot Cookies


I wanted to share with you one of my favorite cookies in the whole wide world.

Yaya Vittles, my paternal grandmother, always has these at the holidays.  Either she makes them herself, or her friends do and bring them over.

However, trying to get the correct recipe out of my grandmother proved to be quite a task.

Years ago, I asked her for it, and she somehow ended up writing half the correct amount of sugar, and forgot the oven temperature.  Needless to say, they came out awful, and I ended up losing the recipe anyway.

Then a few years later, I asked her for it again, and that attempt left out the baking time and the eggs.  

Ummm... yeah.  Not so helpful.  

So then I ended up getting a much more reliable recipe from my mom's side - supposedly this one came from my great-grandmother's family, who was from Italy.  

my great-grandmother (who I called 'Gigi')

(But these days you can find similar recipes all over the internet - it's very popular with Italian Americans.  My brother-in-law's girlfriend Kristen was making them too today, with her family's recipe.)

In any case, they're similar to the ricotta cookies Mr. Vittles loves, but these have anise extract in them. 


Wait, though, before I completely lose you here - let me tell you that I do not typically like anise.  Or licorice, or anything like it.

But in this case, it gives these cookies a subtle, anisette-like flavor that (I think) is awesome.

I know it's kind of an acquired taste though, so I'll usually put half anise & half vanilla extract.  Feel free to do that if you're unsure.  

You can also use all lemon extract, if you like?

Personally, I think they're best with anise, but then again that's how I grew up with them :)  Totally up to you!

Italian Knot Cookies

Cookies:
  • 3 C. flour
  • 1/2 t. baking soda
  • 1 T. baking powder
  • 1/2 C. (1 stick) butter
  • 1/2 C. sugar
  • 3 eggs
  • 2 t. pure anise extract 
Icing:
  • 1 1/2 C. powdered sugar
  • 4-5 T. milk (first try 4, then add a little at a time if necessary)
  • 1/2 t. anise extract
Preheat oven to 400 degrees, and line a baking sheet with nonstick foil or parchment paper.

In a medium bowl, combine flour, baking powder, and baking soda.  Set aside.

In large bowl of a mixer fitted with paddle attachment, beat butter, sugar, eggs, and anise on medium speed until combined (it's ok to have chunks of butter floating in the egg).  

With mixer on low speed, gradually add the flour mixture, scraping sides as necessary.  Increase speed to medium low, and beat until dough forms.

Using a small cookie scoop or tablespoon (for uniformity), scoop balls of dough and roll them into fat ropes.  Holding one end in each hand, place on end over the other and press to adhere, forming crescent, knot-like shapes.  (Alternatively, you can just roll them into balls).  

Place on prepared baking sheet, and bake 8-10 minutes until puffed and bottoms are golden.  Leave 1 minute on the baking sheet, then transfer to a wire rack to cool.  

Once cookies are completely cooled, whisk powdered sugar with milk and anise until smooth.  Icing should be somewhat runny.  Dip tops of cookies into icing, and then decorate with colored nonpareils if desired.  Put back on rack to let icing dry.  Store cookies in airtight container.  Makes about 3 dozen

Family Recipe

Saturday, December 17, 2011

Red Velvet Fudge


So how is it that the month of December could have 31 days, yet it seems there is not nearly enough time to fit everything in that you want to do?

Ugh.

This seems to happen to me every year.

For my latest trick....I have been up all night baking cookies and cupcakes, and making tomato sauce and meatballs, because we have five people coming over tomorrow night.

Er... make that tonight.

Since it's currently 1:45AM.

Ack!

And between now & 6PM I still have to clean my house, cook a meal, frost cupcakes, make an appetizer, and somehow help my dad do some Christmas shopping.

Oh, AND make myself somewhat presentable for our company.

But you know what the cure is for feeling overwhelmed?


Red Velvet Fudge.


Red Velvet Fudge

  • 1 1/4 C. white chocolate chips
  • 1 T. semi-sweet chocolate chips 
  • 1/4 t. baking soda
  • pinch salt
  • 3/4 C. sweetened condensed milk
  • 1/2 t. vanilla extract
  • 1 t. red food coloring
  • 1 t. cocoa powder

Line an 8" rectangular loaf pan with foil, allowing excess to hang over edges. Grease foil with non-stick cooking spray, and set pan aside.

In large, microwave-safe bowl, mix chips with baking soda and salt until evenly distributed.  Stir in sweetened condensed milk.  Microwave in 30-second intervals, stirring after each, until chips are melted and mixture is smooth.

Add vanilla, red food coloring, & cocoa and stir well to combine.  Quickly pour fudge into prepared pan, and spread in even layer with spatula.

Refrigerate at least 2 hours, until set, and remove fudge from pan using foil.  Cut into squares, and store leftovers in airtight container in refrigerator.

Original Recipe


**Update 12/24/12: Due to the number of comments that this fudge won't set, I recently made it again following the directions above; it came out fine.  Please note that the consistency of this fudge is softer than the traditional type that requires a candy thermometer - that being said, it should not come out like "goo" or "a dip."  So please make sure you are using the correct ingredients (sweetened condensed milk NOT evaporated milk) as well as the correct ingredient amounts (1 AND 1/4 cups of white chocolate chips; T is tablespoon and t is teaspoon). If this does not set for you, something went wrong.  

LinkWithin

Related Posts Plugin for WordPress, Blogger...