Showing posts with label powdered sugar. Show all posts

Sunday, May 15, 2016

Lemon Ricotta Mousse & Raspberry Parfaits


And... just like that it's May.

Soon enough it will be summer, although the weather we've been having lately certainly doesn't seem like it!  Apparently April's showers decided to come late this year. At the time when I'm usually deciding whether or not to bust out my sandals, I'm instead deciding if I'm ready to give up my boots! It's been cold and rainy for what seems like weeks, and now I'm just waiting for it to go from cool to blazing hot.

I hate when Mother Nature skips over Spring.  Not that Spring is my favorite season, I'm much more of a Fall kinda girl.  But I just like a little transition between the seasons!

On Mother's Day last weekend, we had a fabulous break in the nasty weather that seemed almost summer-like.  We sat outside for a while at my brother-in-law's house, and it was darn near HOT in the sun!

I can't believe I celebrated my third Mother's Day with my Mini Smalls, and now my first with the Minion.  They are getting way too big and time is going by entirely too fast.


This year, the Mini picked out my gifts from her and her brother (cupcake socks, and a stuffed rendition of the 'Kung Fu Panda', respectively).  I am looking forward to many more years of 'interesting' gifts from them!

I always get a little sappy around Mother's Day because it makes me think of my own mom and how much I miss her.


This recipe would have been right up her alley, although Mini Smalls was utterly confused.  When I was cleaning up the food processor, she asked if she could taste the "batter."  I explained that we weren't baking this, it was done- and she was not exactly impressed.  Mini's become my little baker, and she couldn't wrap her mind around a 'treat' that was just some ingredients whipped together with no oven required!

But thankfully our Mother's Day guests (my stepmom and dad) were a little more into the dessert than she was.


Unlike my husband who loves cavity-inducing sugar levels in his desserts, my stepmom is not super into sweets. But she said she really liked this dessert because it was refreshing and not sickeningly sweet. I would have to agree!

Lemon Ricotta Mousse & Raspberry Parfaits

1 C. heavy cream
1 T. powdered sugar
1 15-oz. container whole-milk ricotta
1/4 C. sugar
1 t. lemon zest
1 C. raspberries, washed & dried

In a small bowl, toss sugar & lemon zest.  Use your fingers to rub the zest into the sugar until well-combined, and set aside.

In a food processor, process cream & powdered sugar for approximately 2 minutes until consistency of whipped cream. (You can also do this with a mixer if you'd prefer).  Be careful not to overmix and turn the cream to butter.  Place whipped cream in a medium bowl, and set aside.

Add ricotta to the now-empty food processor with sugar/zest mixture. Process until very smooth, about 2 minutes, scraping sides if necessary.  In batches, adddd ricotta mixture to bowl with whipped cream, and fold together gently until well-combined.

Set out 4 (or 6) parfait cups, small mason jars, or other dessert dishes/bowls.  Place a heaping spoonful of ricotta mousse into each.  Top with raspberries, then another large scoop of mousse. Top with remaining raspberries. Sprinkle with additional lemon zest, if desired.  Serve immediately or refrigerate.  Makes 4 to 6 servings.

Recipe Adapted from Giada di Laurentiis' Raspberry Ricotta Mousse

Sunday, January 12, 2014

Frozen Coconut Chocolate Chip Mousse (Vegan)


Whether it's for medical necessity or personal preference, in this day and age I feel like everyone knows at least one person who has dietary restrictions.

After having some medical issues myself, I had a blood test done in October that seemed to indicate I had mild food allergies to basically every staple of the American diet (namely milk, wheat, corn, eggs, soy, peanuts, and beef).

Let me tell you, this can really mess with your mind.  I challenge anyone to walk into the average grocery store and load up their cart with a variety of foods that do NOT contain any of the above.

Not easy.

Well after getting a skin test done by an allergist a few weeks ago, it turns out I do not have allergies to any foods, except fish.  The doctor suggested that at worst, I may have a sensitivity to gluten and recommended I try a "GF" diet.

But this all came after 6 weeks of avoiding eggs, wheat, and dairy as much as possible.  So although it pains me to give up my breads and flour-based treats, it has been a lot more manageable to avoid one type of food than 3+.

I have only just begun being gluten free after the New Year (and a pasta-filled visit to my grandmother's house yesterday broke my streak!).  But I have to say, whether it was all in my mind or not, I did feel better after limiting those foods.  And in the process, I also realized that while there is really no true substitute for milk (at least in my mind), you can still make some tasty things with alternatives.

Not that I'll be going vegan any time soon.  Right after my allergist appointment, the first thing I did was head to Dunkin' Donuts for an iced coffee with cream - heaven!

Frozen Coconut Chocolate Chip Mousse (Vegan)

  • 1 14-oz. can full-fat coconut milk*
  • 1/3 C. cocoa powder
  • 1/2 C. powdered sugar
  • 1/4 t. salt
  • 1 t. vanilla extract
  • 1/3 C. vegan chocolate chips

Refrigerate coconut milk until cold.  In a large bowl, combine coconut milk with cocoa powder, powdered sugar, and salt.  Mix with an electric mixer on high speed, until fluffy (about 3 minutes).  Add vanilla extract and mix until combined. Stir in vegan chocolate chips.  Transfer to a freezer-safe, coverable container and freeze until firm.

*Note: I have read on more than one occasion that not all coconut milks are created equal.  For one, I don't think this would work with a "lite" coconut milk, or the refrigerated kind in a carton - make sure you use canned, full-fat.  Also, you may need to experiment with different brands of coconut milk.

Recipe Adapted from Kojodesigns

Monday, November 11, 2013

Perfectly Pipable Cream Cheese Frosting


So no longer can we call Mini Smalls a baby ... she is officially a toddler now! (And in an attempt to live up to her new title, she just started toddling around this week... yowza.)

Any occasion this momentous should be marked by something delicious.  Like a red velvet cupcake with cream cheese frosting.

But I must confess that I am a bad mommy and food blogger - on her actual birthday, I bought her a cupcake from a local bakery!  I know, I know... don't judge.  Her birthday was on a Friday and I worked late the night before, so my intention of making her a chocolate zucchini cake was just never realized.

Not that she seemed to mind.


(BTW, do not give a toddler any food dyed bright red, unless you're prepared to throw out their clothes afterward.  Just sayin'.)

But wait, it gets worse.  For her birthday "party" this past weekend, I cheated and make red velvet cupcakes from a box.

Ack!

However... I was not going to put that fake-tasting canned frosting on top, to boot.  So I did at least go to the trouble of making this cream cheese icing, which was perfect for piping.


I must admit, I was not able to eat any of these bad boys until days later - I caught some sort of evil bug that had me down and out not only for the party, but also the whole next day.  Mr. Vittles, my mother-in-law, and my brother-in-law's girlfriend all fell victim to it as well.

So, we may never be able to entice anyone back to our house for a party... but at least they got to enjoy some yummy cupcakes before their involuntary "cleanse."

And more importantly, somehow Mini avoided the Sickness of Death.  Might have been the best birthday gift of all... though it was tough to top some of the awesome presents she received, including a rockin' Elmo, a ball-spitting elephant, and a new wagon (in which she insisted on opening the remainder of her presents).


All in all it was a fabulous celebration.  Thank you to our friends and family for their generosity.  Happy Birthday, Mini Smalls!

Perfectly Pipable Cream Cheese Frosting

  • 2 8-oz packages cream cheese, at room temperature
  • 1/2 cup butter, at room temperature
  • 2 3/4 cups powdered sugar
  • 1 teaspoon vanilla extract
  • pinch salt

In a medium bowl, beat cream cheese and butter with an electric mixer until creamy.  Mix in vanilla and salt, then gradually add the powdered sugar until frosting ingredients are completely combined. (Check the consistency at this point - if the icing seems too soft, add a little more powdered sugar.  If it seems too thick, mix in a teaspoon or so of milk.) Use immediately, and refrigerate cupcakes after frosting.  Frosts about 18 cupcakes (if you pipe it tall, like in my photos.)

Note: Click here for a great tip using plastic wrap for no-mess piping, at Our Best Bites blog.

Recipe slightly adapted from Recipe Girl

Sunday, April 15, 2012

Frozen Peanut Butter Cup Pie


It's in the low 70's outside right now, and the weather forecast for tomorrow tells me it's going to be 85 degrees.

So I think it's safe to say, summer is on it's way!

(So is global warming perhaps, because I don't know that I've ever seen such a warm winter in New Jersey?)

I love summer but the older I get, the more I hate being hot.

I hate being cold too - but at least you can put on sweatshirts and blankets.  There's no escaping oppressive heat.

Mr. Vittles and I have not lived in a house with good air conditioning probably since we both lived at our parents' house.  My first apartment after college (which was really more of a shed?) had one only window unit that I could barely afford to run anyway.  So my house was consistently in the upper 50s in winter and the 80s in summer.  Fun times.

Then our last apartment had central air... but little to no insulation.  So it really never got below the mid-70's at best.

In our place now, we have window units, but it's a large house and we were too cheap to buy a bunch of them - so we only had one for each floor of the house.

Sweat city.

Our new house that we're buying also does not have central air.  I think we're going to look into installing it, but we're not sure yet if that's going to be possible.

I sometimes wonder though how people lived before air conditioning.  Especially in warm climates.  I mean, even in the northeast we still get heat waves where the temperatures reach the upper 90s and lower 100s.

I guess you just get used to it?

Not me though.  Mr. Vittles always teases me that I have a very small window of comfortable temperatures. I think it's between 70 and 73, actually.  If our house is 65 degrees (which it usually is in the winter) then I'm freezing.  If it's 76 degrees in summer, I'm sweating.

Ridiculous, I know.

But there's nothing worse than having to turn on your oven when it's hot out.

So... with the prospect of summer brings the need for no-bake treats!


I saw a recipe on Confessions of A Cookbook Queen for Frozen Peanut Butter Butterfinger Pie and knew I had to save it for summer.

And... also make it immediately.

Just to, ummm, make sure it's good and all.

(Are you buying that excuse?)

In any event, I also knew that Mr. Vittles is not much of a fan of Butterfinger bars, so I figured peanut butter cups were a safer bet.  I also figured I'd throw some hot fudge in the mix for good measure.


This pie may give you cavities, but it will also make you (and your hot kitchen) very happy.  I promise.

Frozen Peanut Butter Cup Pie

  • One chocolate or Oreo Pre-made Pie Crust (6 oz.)
  • 8 oz block cream cheese, softened (I used 1/3 reduced fat from Philly)
  • 3/4 C. sweetened condensed milk
  • 1/2 cup creamy peanut butter
  • 1/4 cup powdered sugar
  • 8 oz tub Cool Whip, thawed (I used a light version)
  • 7 “snack size” Reese’s Peanut Butter Cups, chopped
  • 1/2 C. hot fudge topping (I used Hershey's Extra Dark)
  • Chocolate syrup, for decorative drizzling (optional)

In the bowl of a mixer, combine cream cheese, condensed milk, peanut butter, and powdered sugar.  Beat on medium speed until smooth and completely combined.

Using a rubber spatula, fold in the Cool Whip until combined.  Add chopped candy.

Pour hot fudge topping into bottom of crust (heat the fudge in microwave first if cold or too stiff).  Spread fudge evenly to cover bottom.

Pour peanut butter mixture into pie crust.  Drizzle top with chocolate syrup, if desired.  Cover and freeze until firm.

Adapted from Confessions of A Cookbook Queen

Friday, April 6, 2012

Coconut Patties


I don't know why these seem appropriate for Easter to me, but they do.

Maybe it's just because I love chocolate and coconut, so it seems appropriate for every occasion?

The only person I know who enjoys this combo as much as me is Mr. Vittles.  He doesn't usually get too excited about my treats, but coconut patties are one of his favorite things.

If you have ever taken a trip to Florida, you have probably seen these in airport gift shops and rest stops.

Mr. Vittles grandparents lived down there when he was growing up, so I'm assuming that's how he got introduced.  As for me, my mom's parents had a second home down there and I eventually went to college in Sarasota.

My dad and I used to make the trip to and from school together, so I could have my car on campus.

We always had grand plans for stopping along I-95 & I-75 to see some attractions, such as the Weeki Wachee mermaids.  But as the hours and miles ticked by (and it seemed more & more cramped inside my little 2-door Chevy Cavalier) my dad would inevitably get too impatient to make any side trips.

So after almost 4 years the only things we saw were some rest stops boasting 13-foot gators, this weird place called Alligator Town (where oddly enough we saw not one alligator, nor one other human being?) and South of the Border.

Which, judging by the myriad billboards along the highway, should have been way cooler.  Instead it was mostly disgusting and run-down and just overall tired.

Anyway... back to the coconut patties.  These bad boys are cavity-inducing, chocolate-covered sugar bombs.

But they are freakin' delicious.

Hope you all have a happy holiday!

Coconut Patties

  • 1 1/4 C. powdered sugar
  • 1/2 stick (4 T.) butter, cubed
  • 1 egg white
  • 1 1/4 cups sweetened shredded coconut
  • 1 t. vanilla extract
  • 1/2 t. coconut extract (optional)
  • 1 C. semi-sweet chocolate
  • 1 t. vegetable shortening

Fill a medium saucepan with an inch of water, and set it over medium heat to simmer.
In the bowl of a double boiler (or a heatproof bowl that fits snugly on top of your saucepan), combine the powdered sugar, butter, and egg white, and whisk together. Place the bowl over the saucepan of simmering water, and continue to heat and stir until the mixture is well-combined and very runny, about 5-10 minutes.

Remove the bowl from the heat and stir in the coconut, vanilla, and coconut extract (if using). Cover with plastic wrap, and refrigerate until it is firm enough to scoop, about 2 hours.

Once the candy has firmed up, line a baking sheet with waxed paper or nonstick aluminum foil. Using a teaspoon or small cookie scoop, scoop small balls of the coconut mixture and flatten them into discs between your palms.  Place the discs on the baking sheet, and place sheet in freezer while you prepare the melted chocolate.

Place the chocolate chips and shortening in a microwave-safe bowl and microwave until melted, stirring after every minute.

Remove baking sheet with discs from freezer.  Using a fork or dipping tools, dip the discs in the chocolate and drag the bottom against the lip of the bowl to remove excess chocolate. Place the dipped patty on the prepared baking sheet and repeat with remaining coconut candy and chocolate.

Place the dipped patties in the refrigerator to set the chocolate, about 20 minutes. Store coconut patties in a airtight container in the refrigerator for 1-2 weeks.

Recipe slightly adapted from About.com

Saturday, March 24, 2012

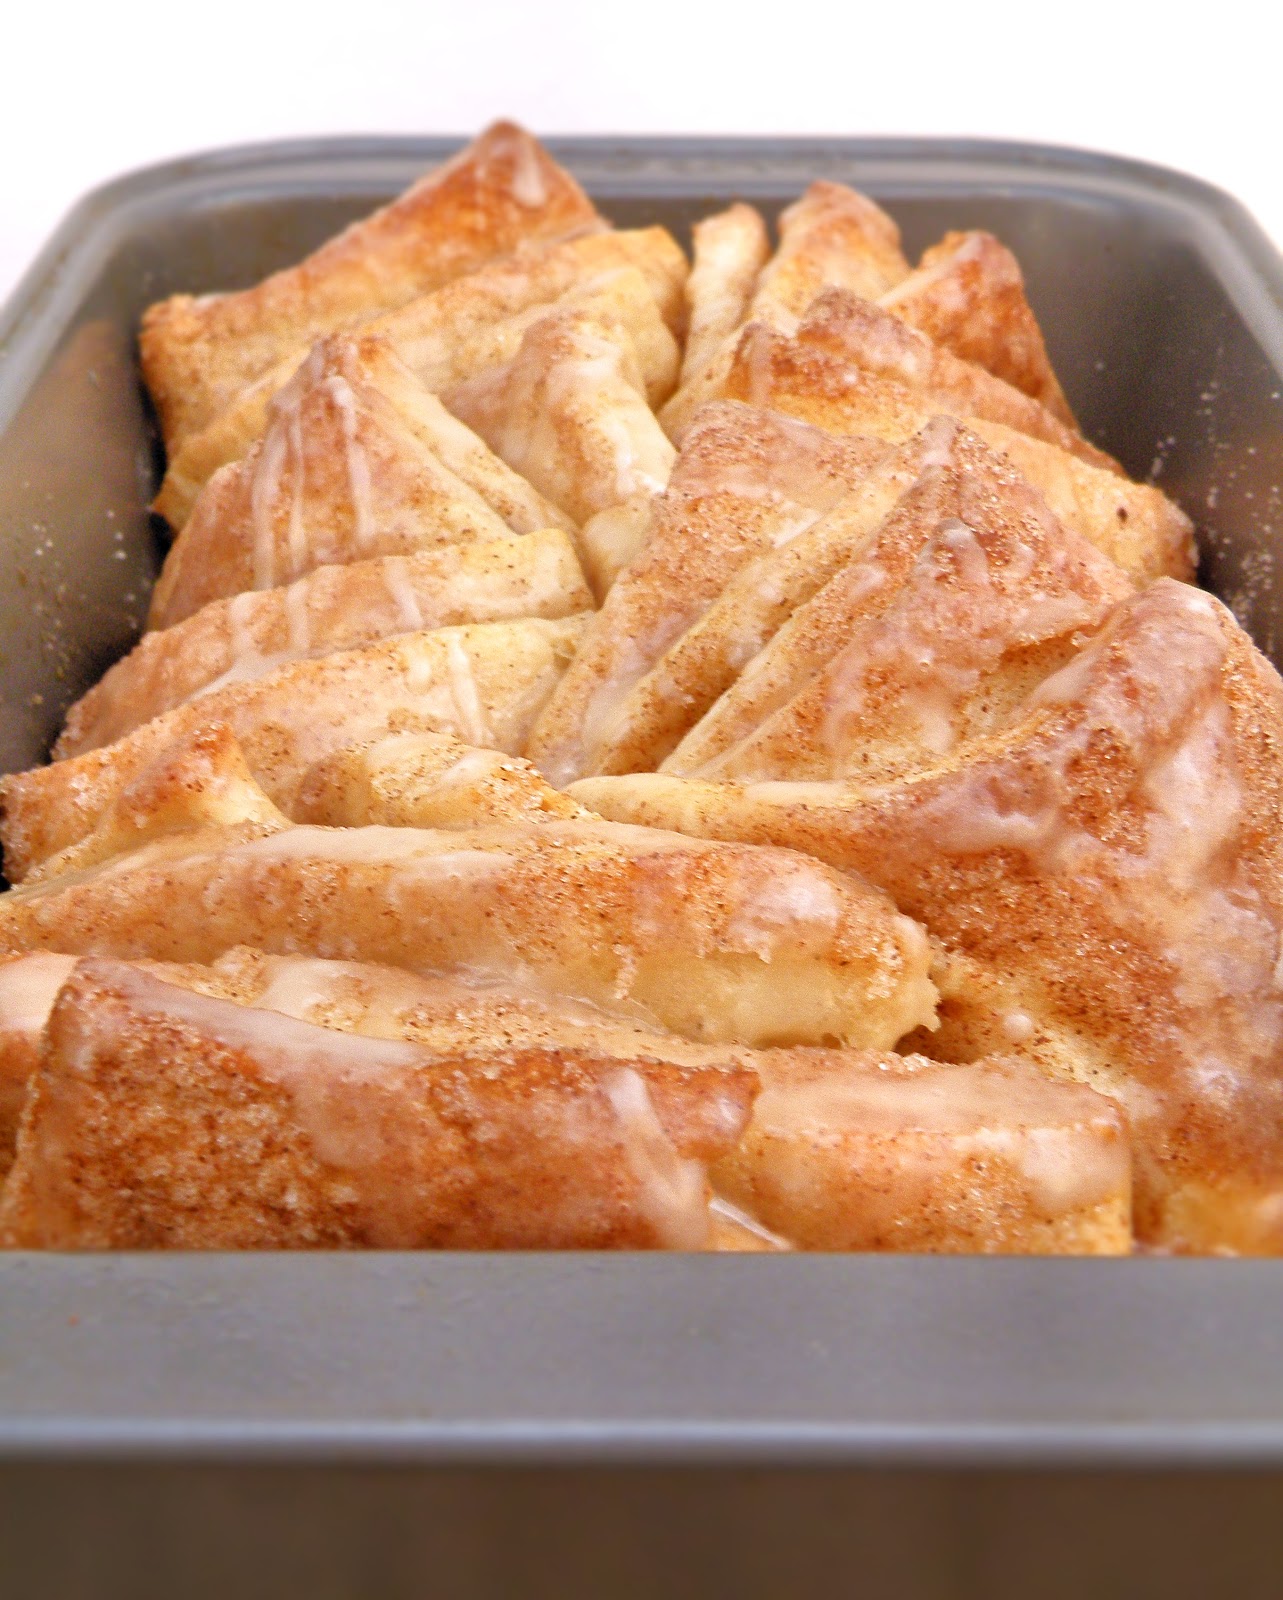
Overnight Pull-Apart Cinnamon Loaf


I was reading the April issue of Better Homes & Gardens when I came across this recipe.  

And there was no doubt in my mind that it would be part of my weekend menu.

I think my dough didn't rise as fully as it was supposed to... probably because the 'active' dry yeast was being lazy.

(Actually I believe it was because I didn't warm the milk enough to activate the yeast fully.  But it sounds better to blame lazy yeast than myself.)

Anyway, a half-risen dough ball meant I didn't have as big of a rolled-out rectangle as I was supposed to.  So then the stacked rectangles seemed too puny for the loaf pan.

But despite these issues, my loaf ended up filling out rather nicely while baking, and the smell in the house was incredible.   And the taste did not disappoint either - this was soooo delicious!

It's a perfect combo of sweet, sticky, soft & pillowy, and with a little crunch on top.

Mmmm.


What's also nice is that you can start the recipe the night before, let the dough rise overnight in the fridge, and finish it the next morning to cut down on the wait time.

Mr. Vittles had to give an estimate for a job this morning, and my loaf was done a little while before he came home.  Which worked out well because I could take my photos without any of his usual teasing... but I must admit, being left alone with this loaf was almost deadly for my waistline.

I seriously considered eating the whole thing and telling Mr. V that it got ruined and I had to throw it away.  

But luckily I got a hold of my self-control, and he came home a few minutes later anyway ;)

So be warned - make sure you are not left with this unsupervised!

Overnight Pull-Apart Cinnamon Loaf

Dough:
  • 3/4 C. milk
  • 1 package active dry yeast
  • 1/4 C. (4 T.) butter, melted
  • 2 T. granulated sugar
  • 1 egg, lightly beaten
  • 1/2 t. salt
  • 2 1/2 C. all-purpose flour 
  • 1/2 C. whole wheat flour (or more all-purpose flour)

Filling:
  • 1/4 C. (4 T.) butter, melted
  • 3/4 C. granulated sugar
  • 2 t. ground cinnamon

Glaze:
  • 1/2 C. powdered sugar
  • 1/2 t. vanilla
  • 1 - 2 T. milk (however much is needed to achieve pourable consistency)

Make dough:  In a microwave-safe measuring cup, heat the milk until just warm (105 to 115 degrees F).  Pour into large bowl of a stand mixer, then add the yeast.  Stir until yeast is dissolved.  Let stand 5 minutes or until foamy.

In small bowl, combine flours & set aside.  With a mixer, beat 1/4 cup melted butter, 2 tablespoons sugar, egg, and salt into the yeast mixture until combined. Add half the flour (1 1/2 cups), then beat on low for 30 seconds, scraping bowl as needed.  Increase speed to medium and beat 3 minutes more.  Stir in remaining flour. 

Shape into a ball (dough will not be smooth).  Transfer dough to an oiled bowl, and cover top of dough with a little more oil. Cover and refrigerate overnight, or up to 2 days. (Or, to make right away, cover and set in a warm place to rise for 45 to 60 minutes or until nearly double).

Grease a 9x5x3-inch loaf pan; set aside.  Remove dough from the refrigerator.  On a lightly floured surface, roll dough to 20x12-inch rectangle (or as close to it as possible).  Brush surface of dough with 1/4 cup melted butter, then sprinkle with the mixture of sugar and cinnamon (I actually ended up not using all the cinnamon sugar, but it's up to you).  

Cut the dough rectangle crosswise in five equal strips:
Stack strips on top of each other, then cut the stack into six pieces.  
You will now have 6 stacks of five rectangles.  Leave the stacks intact, and turn stacks on their side (cut sides up).  Place the pan lengthwise (so the short side is facing you) and loosely stagger pieces, diagonally, in pan. 


Coat top with any leftover butter and cinnamon sugar.

Let rise in a warm place for about 30 to 45 minutes. Meanwhile, preheat oven to 350 degrees F. 

Bake loaf about 30 minutes or until golden brown.  Place pan on wire rack to cool.  (Here you can either let the loaf cool 10 minutes, and then take out of pan & place on serving plate to glaze. OR you can glaze it immediately, while it's still in the pan, for a more informal serving. I did the latter, and just pulled the pieces right out of the pan.  Depends on your preference!)  Make glaze:  In a small bowl or measuring cup, stir together powdered sugar, vanilla, and enough milk to make a glaze of drizzling consistency.  Pour glaze over top of loaf.  I would recommend eating while it's still warm, but you can also let cool before serving.  Makes 8-10 servings.

Recipe Slightly Adapted from Better Homes & Gardens

Saturday, February 11, 2012

Dark Chocolate Cupcakes with Strawberry Buttercream


I've always had a funny little relationship with Valentine's Day.

As a kid, I guess it was kinda fun to pick out your mini valentine cards for all your classmates and eat candy, but as soon as 'love' started getting involved I became mostly uninterested.

Once, in the 6th grade, I was surprised to find a full-sized Hallmark card mixed in my stack of tiny envelopes.  It was from a classmate of mine who apparently had a crush on me.

His name was Nick.  And if I remember correctly, the card asked if I would be his girlfriend.

Such a sweet thing to do, right?

Well I wrote on it "Never in a million years" and promptly returned it to him.

True story.

I was a mean, horrible, rude little person at the age of 12.  Definitely not my proudest moment.

(By the way, years later I sincerely apologized to Nick for being so awful to him in that situation, and we actually became friends).

But even though I can appreciate a gesture like that now, the truth is I'm still not much of a romantic.

I would choose to watch 300 over Sweet Home Alabama any day.

And while I do indulge in The Bachelor, I view it more as a train wreck you can't look away from then a fairy-tale love story.

Mr. Vittles would wholeheartedly agree.  On one of the few occasions he tolerated Bachelor-viewing in his presence, he said to me "I don't understand why they always have to have rose petals & candles everywhere in this show - somebody's gotta go and light all those candles, and vacuum all those things up afterwards."

So luckily for him, I've really never been a fan of Valentines Day.

Not because I don't like love.  I do!  There's no better feeling in the world than truly being in love, no matter what stage of the relationship you're in.

But I don't need jewelry or overpriced dinners in the company of every other couple in America to celebrate my love.

Plus V-Day comes right on the heels of my birthday, so it seems wrong having my husband shower me with gifts twice in a matter of weeks.

Though I guess most ladies would welcome this.  Some would even demand it.

But that's just not my style.

I can get down with a simple card, and maybe a little chocolate - best way to a Maggie's heart is through her stomach.

(Another true story).


Actually, some chocolate-covered strawberries would be excellent.

Almost as good is... a chocolate strawberry cupcake.


But since I'm fairly certain that Mr. Vittles will be making me neither of these treats, I guess it's up to me to do the baking!

Dark Chocolate Cupcakes with Strawberry Buttercream

Dark Chocolate Cupcakes

  • 1 stick (8 T.) butter, cut in 4 pieces
  • 2 oz. bittersweet chocolate, chopped
  • 1/2 C. Dutch-processed cocoa
  • 3/4 C. all-purpose flour
  • 1/2 t. baking soda
  • 3/4 t. baking powder
  • 2 large eggs
  • 3/4 C. sugar
  • 1 1/2 t. pure vanilla extract
  • 1/8 t. salt
  • 1/2 C. sour cream (4 oz.)

Adjust oven rack to middle position and preheat oven 350 degrees.  Line a standard-sized muffin pan with baking-cup liners and set aside.

Combine butter, chocolate pieces, and cocoa in medium heat-proof bowl.  Set bowl over saucepan containing barely simmering water, and heat mixture until butter and chocolate are melted.  Whisk until smooth & combined.  Set bowl aside to cool mixture until just warm to the touch.

Whisk flour, baking soda, and baking powder in a small bowl to combine.  Set aside.

In second medium bowl, whisk eggs to combine, then add sugar, vanilla and salt.  Whisk until fully incorporated.  Add chocolate mixture and whisk until combined.  Add about 1/3 of flour mixture over chocolate mixture and whisk until combined.  Add sour cream and whisk to incorporate.  Then add remaining flour mixture and whisk to combine, using a spatula as necessary to fold in any un-incorporated parts at the bottom of the bowl.

Divide batter evenly among muffin cups.  Bake until toothpick inserted in center of cupcakes comes out clean, about 18-20 minutes.

Cool cupcakes in pan set on wire rack until cool enough to handle (about 15 minutes).  Carefully lift each cupcake from pan, and set on wire rack to room temperature (about 30 minutes) before frosting with strawberry buttercream (recipe below).

Strawberry Buttercream

  • 3 large strawberries, hulled, washed & dried, and at room-temperature
  • 1 stick (8 T.) butter, room temperature
  • 1/4 t. vanilla extract
  • pinch salt
  • 3 - 4 C. powdered sugar
  • 1 T. heavy cream
  • 1 t. strawberry jam (optional)

In the bowl of a food processor, pulse berries until chopped.  Add butter, vanilla, salt, and 2 C. of powdered sugar.  Pulse until well-combined.

Add cream and small amounts of powdered sugar, pulsing after each, until strawberries are pureed and mixture reaches desired consistency.  The frosting should be smooth & soft, yet hold its shape.  Pipe or spread onto cooled cupcakes.

Store leftover cupcakes in refrigerator, and bring to room-temperature before serving again.  Makes 12 cupcakes.*

*If you want to double the amount of cupcakes, make 2 separate batches of batter and bake separately.  According to Cook's Illustrated, doubling the recipe and baking the trays together does not yield as good of a cupcake.

Cupcake Recipe Slightly Adapted from Cook's Illustrated; Buttercream Recipe Slightly Adapted from Sophistimom blog

Tuesday, March 15, 2011

Chocolate Peanut Butter Candy Cake


So I like to think I've been around the block and back with baking... but I have to admit, this cake kinda threw me for a loop. 

I am used to creaming the butter and sugar, then adding the wet ingredients.  But this cake barely has any butter (no oil either) and the sugar gets treated like a 'dry' ingredient.

Hmm.  So what gives?

I read up on this method of baking cakes, and apparently it yields a shorter cake but one that's more tender and velvety.

Umm...I can get down with that. 

Especially when it's slathered in chocolate and peanut butter. 

Chocolate Peanut Butter Candy Cake

  • 2 eggs
  • 1/2 t. vanilla
  • pinch salt
  • 1 C. sugar
  • 1 C. flour
  • 1/2 C. milk
  • 1 T. butter, melted
  • 1 t. baking powder
  • 1/2 C. peanut butter
  • 2 T. powdered sugar
  • 1/2 C. semisweet chocolate chips
  • 1/4 C. milk chocolate chips
  • 1/4 C. heavy cream
Preheat oven 350 degrees.  Grease 8" square metal pan.

In small bowl, combine sugar, flour, baking powder, and salt.  Whisk to distribute ingredients evenly.  In separate large mixing bowl, beat eggs on medium-high until lemon-colored.  Add milk and butter, and whisk together. 

Add dry ingredients and stir briefly to combine, then increase speed to medium and mix about one minute more.  Pour into prepared pan and bake 20-25 minutes - do not overbake.

While cake is baking, blend powdered sugar into peanut butter until fluffy.  When cake is finished baking, spread peanut butter mixture evenly over top and refrigerate 30 minutes until set.

Then combine chocolate chips with heavy cream in microwave-safe bowl or large measuring cup.  Heat in 20 second intervals, stirring after each, until mixture is smooth.  Pour over cake and use spatula to spread evenly.

Refrigerate aboute an hour or until chocolate is set and serve.  Keep leftovers refrigerated.

Recipe Adapted from Allrecipes.com

Monday, December 27, 2010

Russian Tea Cakes


Ok so first things first - MERRY CHRISTMAS!

Or Happy Holidays, Happy End of December, Happy Blizzard - I mean, seriously, whatever it is you're celebrating right now, I hope it's happy.

All I know is, the last six days have been filled with so much shopping, decorating, gift-wrapping, gift-opening, baking, visiting, eating, laughing, family beer pong(!), cat-dancing (!!), and SNOW that I don't even know what to write about first.

But this is what it looks like outside my house right now, so since I had already taken today & tomorrow off from work anyway, I don't think I'll be doing much until Wednesday.


We got about 2 feet of snow since mid-day yesterday (it's stopped now, thankfully) but the wind has caused it to drift much higher in parts.  

To give you an idea of what you're looking at, here is a comparison of our back deck in the summer and now.

this summer


today

You can barely see the top of the hammock post ha!  Pretty crazy, huh?

Now if it wasn't so awful out (a state of emergency was declared in New Jersey this morning) I'd probably be out somewhere, fighting my way through the crowds of after-Christmas shoppers for some deals.

But since Mr. Vittles and I have not stopped since we got back from Lake Placid last Monday, it's actually pretty nice to be home on the couch with you guys :)

So on that note, down to business.  Mr. V and I had an amazing holiday.  We are so thankful to have not only each other, but such wonderful family & friends, and the last few days have been a blast.

We got to decorating our tree a little late this year but I think it looks great.
           

As Mr. V reminded me, this was our 4th Christmas together and our 3rd tree.  Already, we are building a nice little collection of ornaments that are special to us, like this handmade one from my mother-in-law who does the most beautiful needlepointing:


and another of Lady and the Tramp from my mother, who also wrote us a sweet message on the box:


It says, "May you always have butterflies when you look into each others' eyes.  We wish you love.  Happy first tree."

I also love having an excuse to use my very favorite Snoopy winter plates.  Aren't they so fun?
It's the little things that make me smile.

What also makes me smile is holiday goodies.  It's a lot of work but what's Christmas without sweet treats?

I made three types of cookies and two types of fudge this year, though, so it was tough to decide what recipe to share with you today.  

This one is actually not one of my personal favorites, however it is a family favorite on my mom's side.  And when I asked my dad if he had any requests for Christmas cookies (I figure, if you're gonna break your diet it may as well be with something you love), even he asked for 'those white snowballs with nuts.'

Which I guess is especially appropriate with all the snow we just got?

Anyway, my family calls them Russian Tea Cakes, but you may know them as something else.  I'm not sure where the recipe originated, but Grammy Vittles has been making them for years and it has become a family tradition.  So my aunt just had to put the recipe into a cookbook she & my mother put together years ago for her antique & country store in Connecticut, and this is the first year I've tried making them myself.


I did have to double check my eyes though, because the recipe doesn't call for any eggs and that threw me off a bit.  But no worries- anyone I've ever known who likes nuts just loves these rich, buttery cookies.


So while I know it's a little late - hope you all are having a wonderful holiday season!  And as always, thanks for reading - without you, this would not be any fun :)

Russian Tea Cakes
  • 1 C. butter (2 sticks), softened
  • 1/2 C. powdered sugar (plus about 1 1/2 C. more for decorating)
  • 2 1/4 C. flour
  • 1/4 t. salt
  • 1 t. vanilla extract
  • 3/4 C. finely chopped nuts (I used walnuts, but you can use pecans or whatever you choose)
Cream butter and sugar until fluffy, then add remaining ingredients & beat to combine.  Chill dough about 30 minutes, covered.  Preheat oven 350 degrees, then shape dough into 1" balls.* 

Bake 14-17 minutes, or until golden.  Roll in powdered sugar while still warm, then roll again once cookies are cooled.

*Note: I used a spring-loaded cookie scoop to form the dough into balls, and that seemed to work fine - just ensure the scoop is packed hard, so the cookies don't crumble apart when you squeeze the lever.  

Family Recipe - Origin Unknown

LinkWithin

Related Posts Plugin for WordPress, Blogger...