Saturday, March 24, 2012

Overnight Pull-Apart Cinnamon Loaf


I was reading the April issue of Better Homes & Gardens when I came across this recipe.  

And there was no doubt in my mind that it would be part of my weekend menu.

I think my dough didn't rise as fully as it was supposed to... probably because the 'active' dry yeast was being lazy.

(Actually I believe it was because I didn't warm the milk enough to activate the yeast fully.  But it sounds better to blame lazy yeast than myself.)

Anyway, a half-risen dough ball meant I didn't have as big of a rolled-out rectangle as I was supposed to.  So then the stacked rectangles seemed too puny for the loaf pan.

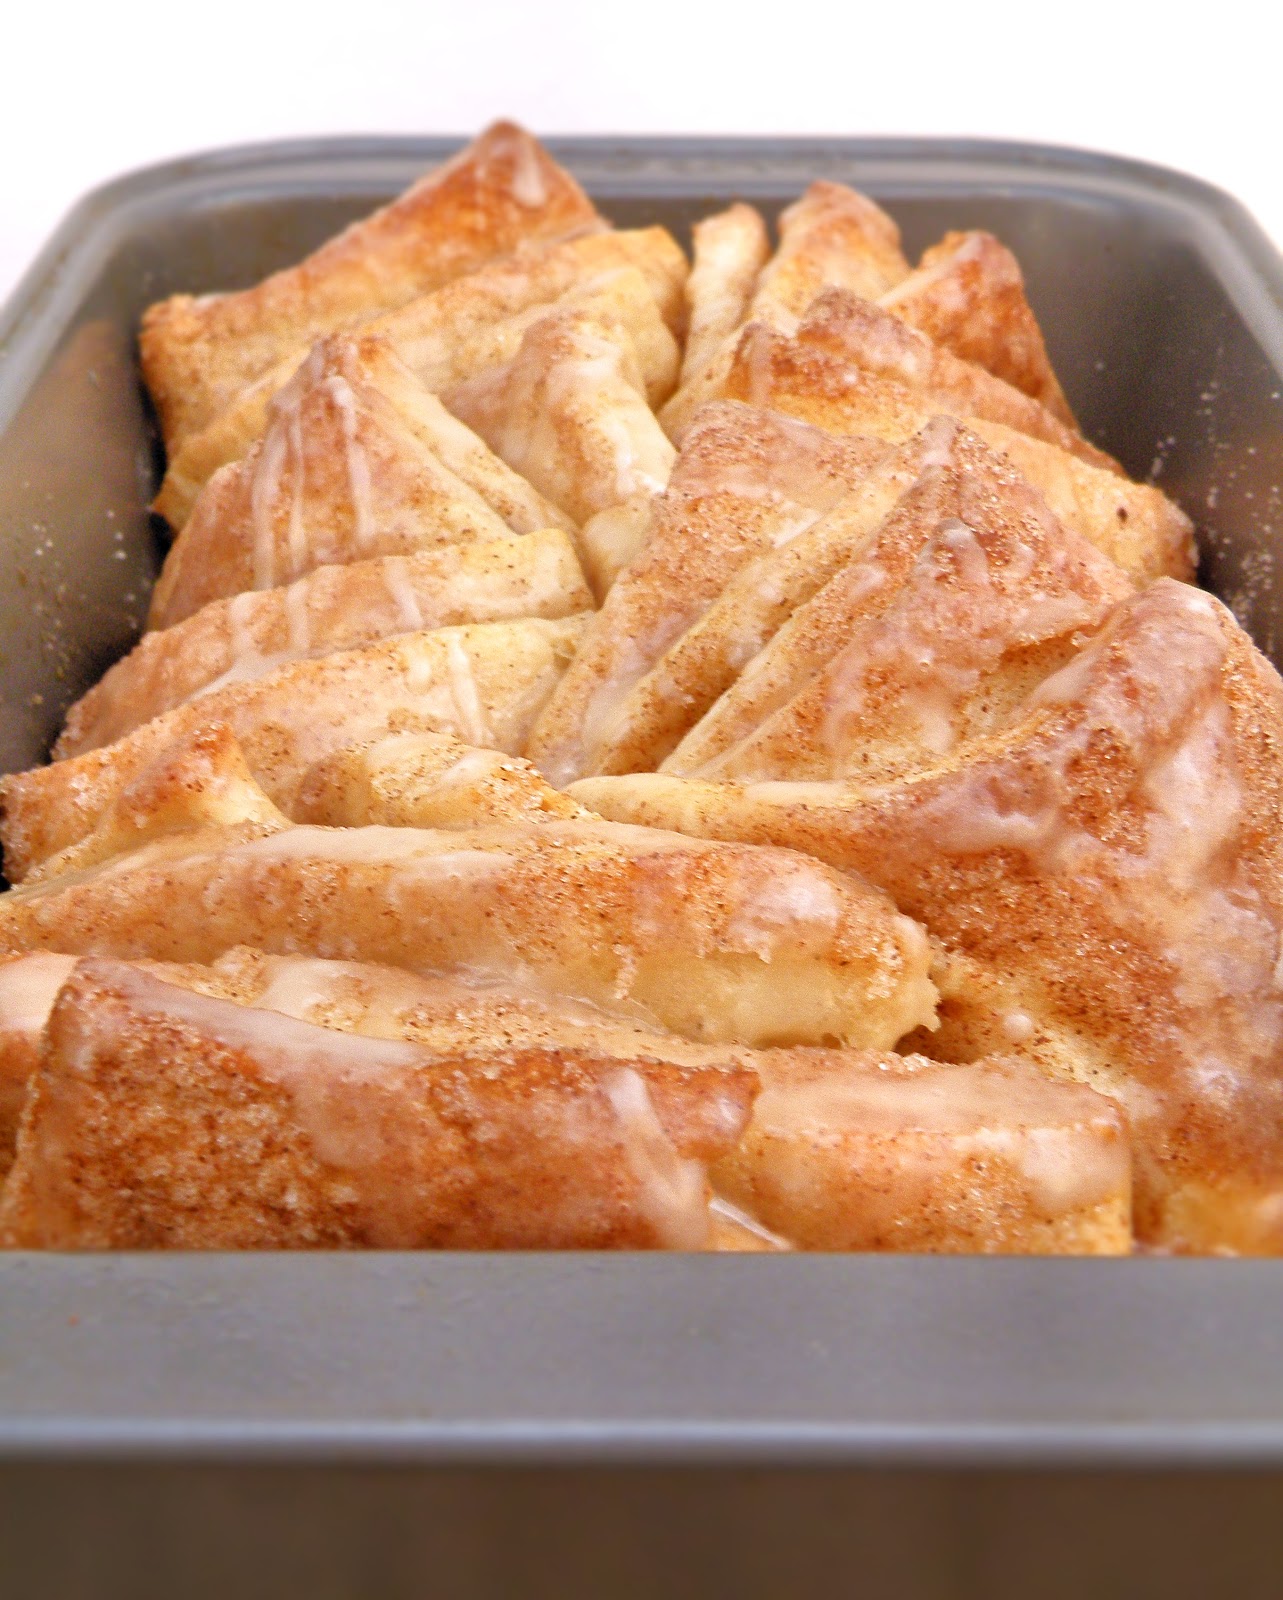
But despite these issues, my loaf ended up filling out rather nicely while baking, and the smell in the house was incredible.   And the taste did not disappoint either - this was soooo delicious!

It's a perfect combo of sweet, sticky, soft & pillowy, and with a little crunch on top.

Mmmm.


What's also nice is that you can start the recipe the night before, let the dough rise overnight in the fridge, and finish it the next morning to cut down on the wait time.

Mr. Vittles had to give an estimate for a job this morning, and my loaf was done a little while before he came home.  Which worked out well because I could take my photos without any of his usual teasing... but I must admit, being left alone with this loaf was almost deadly for my waistline.

I seriously considered eating the whole thing and telling Mr. V that it got ruined and I had to throw it away.  

But luckily I got a hold of my self-control, and he came home a few minutes later anyway ;)

So be warned - make sure you are not left with this unsupervised!

Overnight Pull-Apart Cinnamon Loaf

Dough:
  • 3/4 C. milk
  • 1 package active dry yeast
  • 1/4 C. (4 T.) butter, melted
  • 2 T. granulated sugar
  • 1 egg, lightly beaten
  • 1/2 t. salt
  • 2 1/2 C. all-purpose flour 
  • 1/2 C. whole wheat flour (or more all-purpose flour)

Filling:
  • 1/4 C. (4 T.) butter, melted
  • 3/4 C. granulated sugar
  • 2 t. ground cinnamon

Glaze:
  • 1/2 C. powdered sugar
  • 1/2 t. vanilla
  • 1 - 2 T. milk (however much is needed to achieve pourable consistency)

Make dough:  In a microwave-safe measuring cup, heat the milk until just warm (105 to 115 degrees F).  Pour into large bowl of a stand mixer, then add the yeast.  Stir until yeast is dissolved.  Let stand 5 minutes or until foamy.

In small bowl, combine flours & set aside.  With a mixer, beat 1/4 cup melted butter, 2 tablespoons sugar, egg, and salt into the yeast mixture until combined. Add half the flour (1 1/2 cups), then beat on low for 30 seconds, scraping bowl as needed.  Increase speed to medium and beat 3 minutes more.  Stir in remaining flour. 

Shape into a ball (dough will not be smooth).  Transfer dough to an oiled bowl, and cover top of dough with a little more oil. Cover and refrigerate overnight, or up to 2 days. (Or, to make right away, cover and set in a warm place to rise for 45 to 60 minutes or until nearly double).

Grease a 9x5x3-inch loaf pan; set aside.  Remove dough from the refrigerator.  On a lightly floured surface, roll dough to 20x12-inch rectangle (or as close to it as possible).  Brush surface of dough with 1/4 cup melted butter, then sprinkle with the mixture of sugar and cinnamon (I actually ended up not using all the cinnamon sugar, but it's up to you).  

Cut the dough rectangle crosswise in five equal strips:
Stack strips on top of each other, then cut the stack into six pieces.  
You will now have 6 stacks of five rectangles.  Leave the stacks intact, and turn stacks on their side (cut sides up).  Place the pan lengthwise (so the short side is facing you) and loosely stagger pieces, diagonally, in pan. 


Coat top with any leftover butter and cinnamon sugar.

Let rise in a warm place for about 30 to 45 minutes. Meanwhile, preheat oven to 350 degrees F. 

Bake loaf about 30 minutes or until golden brown.  Place pan on wire rack to cool.  (Here you can either let the loaf cool 10 minutes, and then take out of pan & place on serving plate to glaze. OR you can glaze it immediately, while it's still in the pan, for a more informal serving. I did the latter, and just pulled the pieces right out of the pan.  Depends on your preference!)  Make glaze:  In a small bowl or measuring cup, stir together powdered sugar, vanilla, and enough milk to make a glaze of drizzling consistency.  Pour glaze over top of loaf.  I would recommend eating while it's still warm, but you can also let cool before serving.  Makes 8-10 servings.

Recipe Slightly Adapted from Better Homes & Gardens

Sunday, March 18, 2012

Irish Cream Mocha Fudge


Happy belated St. Patrick's Day, everyone!

I would have liked to post this before the holiday, but this past week really got away from me!

I made this fudge on Friday night for a party we went to yesterday in NYC.

In the spirit of starting festivities early, some of Mr. Vittles' friends hosted a brunch... in their amazing apartment that has not one but three decks.  It turned out to be a beautiful day, so we were able to spend a lot of time outside.

But since we wanted to take the train into New York, which takes about an hour & 45 minutes from our house, we had to be on the train by 7:50AM.

Usually on a Saturday morning, I am not even awake yet at that time.   (I get up at 6:15AM on weekdays for work though - don't worry, I'm not a total bum).  And to make matters worse, I overslept because I set my alarm incorrectly, so I was rushing and had no time for coffee or food.  The foggy weather here yesterday morning was not helping me pep up, either.  So I would have liked nothing more than to take a little nap on the way up to NYC... but I quickly found out that was not in the cards.

The train was filled with young (mostly college-aged) people, all decked out in green, I guess heading into the city for the St. Patrick's Day parade.  NJ Transit allows people to drink on the train, so they were already getting rowdy.  About twenty minutes into the trip it was already standing-room only.  On our particular car, there was a girl who was apparently having a birthday, and we must have heard the song "Happy Birthday" about ten times over the duration of the trip.  Not to mention other songs ("99 Bottles of Beer on the Wall"), various screams and chants, and also lots of banging on the roof of the train car.

My dad warned me from experience that the "drunk train" was going to be interesting.  But we were expecting that to be at night, not at 8 in the morning.

Surprisingly the train ride home around 5PM was much calmer.  I think at that point people were exhausted from drinking all day and ready for a nap.  Luckily, that early in the evening we were with either the lightweights or the smart people who had enough sense to call it quits - not the heavyweights, or ones that were forced by their friends to rally for the good of the group, and would likely end up spending more time in the bathroom than their seats.

If they even made it that far.

...

Yucky.

So anyway, St. Patty's Day is not one of my favorite holidays (mainly for the above reasons).  But we had a great time at the party, and hopefully everyone enjoyed the fudge.


It has loads of sugar, so it at least got the Mr. Vittles seal of approval!

Irish Cream Mocha Fudge

  • 1/3 C. Irish cream (such as Bailey's)
  • 1 T. instant coffee granules
  • 3/4 C. (1 1/2 sticks) butter
  • 1 7-oz. jar marshmallow cream
  • 3 C. sugar
  • 1/2 C. evaporated milk
  • 1 12-oz. bag milk chocolate chips
  • 1/2 C. semi-sweet chocolate chips
  • dash salt
  • 1 t. vanilla

Line a 9x13" pan with foil, and grease with nonstick cooking spray.  Combine milk and semi-sweet chocolate chips with salt in a large heatproof bowl & set aside.

Combine Irish cream with instant coffee in a small, microwave-safe bowl or measuring cup.  Microwave 20 seconds (more if needed) and stir to dissolve coffee granules.  Set aside.

In large saucepan over medium heat, combine butter, marshmallow creme, sugar, and evaporated milk, stirring until melted.  Slowly add irish cream mixture and bring to a simmer, stirring frequently, about 5 minutes.  (Reduce heat if mixture starts to burn).

Pour mixture over chocolate chips, and add vanilla.  Stir until mixture is smooth and creamy.  Pour into prepared pan and smooth evenly to sides.  Let chill in refrigerator until set, then cut into 1" squares.  Can be kept at room temperature, or in refrigerator if desired.  Makes one 9x13 pan of fudge.

Recipe Adapted from Justapinch.com

Sunday, March 11, 2012

Baked Zucchini Chips


Well I said last week that I'd probably be up to my old tricks by now.

But much to my own surprise, I decided to try another 'healthy' recipe I've been thinking about - zucchini chips!

If you ever look at the sidebar of my blog that lists 'popular recipes' you will see that Apple Chips are number one.

They have been for a while now, but the funny part is that they are number one by a landslide.

Mr. Vittles occasionally looks over my shoulder while I'm reviewing my blog's stats, and he is always so amused by the fact that the Apple Chips completely dwarf every other post.

This fact is absurdly evident by a bar graph that shows the top 10 posts' all-time number of views... basically one long bar, with a whole bunch of short ones beneath it.

Up until this week (when Cheesy Bacon Oven Chips suddenly blew up on Pinterest) the Apple Chips had four times more views than the 2nd most popular post.

So... in light of people's apparent interest in this recipe, Mr. V decided that I need to make chips out of something else.

And the next, most logical thing that came to my mind was zucchini.


To me, these chips taste kinda like thin & crispy pumpkin seeds.  (I guess that shouldn't be too much of a surprise since they are relatives in the squash family).  Much lighter, but the taste is similar.

And the seasoning possibilities are endless - you can tailor them to your liking.  Garlic, paprika, chili powder... use your imagination!  I went with a basic Seasoned Salt and they came out great.  But whatever you choose, just make sure you go easy on the seasonings, and only use a little bit - these do shrink a lot in the oven, so what looks like a reasonable amount on the raw veggies could turn out to be way too much!


Baked Zucchini Chips

  • 1 zucchini 
  • canola cooking spray
  • seasoned salt, or other seasoning(s) of your choice

Preheat oven to 225 degrees Fahrenheit.  Line a baking sheet with parchment paper or nonstick foil, and spray with canola oil.  Set aside.

Slice zucchini into thin medallions, about the thickness of a quarter.  (You can either use a knife & a very steady hand, or a mandoline slicer.)

Lay out slices on prepared baking sheet, and spray tops lightly with additional cooking spray.  Sprinkle with seasonings of your choice. (A note on seasoning, however - use LESS than what seems appropriate.  These shrink considerably in the oven, and if you use too much it gets very concentrated.  It's better to end up underseasoning and add more later.)

Place in preheated oven and bake 45 minutes.  Rotate baking sheet, and bake an additional 30-50 minutes, until chips are browned and crisped to your liking.  These are best eaten within a couple hours of removing from the oven, as they start to get chewy if left out.  One zucchini makes one serving (1/4 C. - 1/3 C. of chips depending on the size of your squash).

Original Recipe

Sunday, March 4, 2012

Blueberry Oat Muffins


For the past few months, Mr. Vittles and I have been on a house hunt.

And so far, the process of becoming a home-owner has been exhilarating, frustrating, and terrifying all at the same time.

I have literally memorized the MLS listings in our price range and geographical area, yet they all start to run together after a while.

This past week, we set out to visiting 7 houses we'd seen online and wanted to drive by.  As we were on our way to the third one, Mr. Vittles kept commenting about how familiar everything seemed.  We had looked at other homes in the neighborhood so I thought nothing of it - until we pulled up to the house and realized we had already looked at it in December, and crossed it off the list.

Whoops.  My bad.

We've had one house in mind, though, from the very beginning.  And I think negotiations are finally about to wind down, and (barring any serious issues) the house will likely be ours!

YAY!!

Owning a home has actually been our goal for years, but with Mr. Vittles' job as an assistant golf course superintendent, it was very likely that we'd have to move for him to be promoted to running his own course.  But we had no idea when he'd be able to move up, or (worse yet) where that would be.

Then this fall, he had an opportunity to become a partner with his brother & father in a construction business, and ultimately decided it was time to leave the industry he worked in for 13 years.  Everything has been going really well with their company, and we finally have the stability we needed to start putting down some roots.

For me the move is bittersweet, though.  While I am thrilled at the prospect of owning a home, I'm also sad to leave the house & neighborhood we live in now.

I am also pretty bummed about moving, in & of itself... once again.  We're hoping this is our last move for while, but since graduating college seven years ago this will be my fifth time moving.  And Mr. V has the same amount under his belt, if not more.

It's basically just one giant, exhausting game of Tetris and I am not looking forward to it in the least.

Still, the bright side is that you typically shed a lot of unwanted or unneeded items (we already have 8 huge shopping bags of stuff to donate to Goodwill).

You also inevitably eat way less, because you are so busy there's hardly time to concern yourself with petty things like hunger except for extreme situations.

And then... there's the workout.  Scrubbing down both the house you're in and the house you're moving to.  Lifting boxes. Going up & down stairs. Standing for hours on end, fitting items into boxes, then fitting those boxes into vehicles. (See? It's Tetris, I'm telling you.)

Our move last February came at a rough time, though - I was recovering from foot surgery on both feet.  So a lot of the work fell on my poor hubby, and yet I still pushed the envelope more than I should have.

(When my doctor & physical therapist told me to 'take it easy for a while' I'm thinking they probably didn't mean 'move everything you own into a house with 3 floors & a basement'?)

But this time I will be ready.

This time I will not wimp out on Mr. Vittles.

My feet are fine, I'm feeling energized, and this week I'll be eating these healthier, whole grain blueberry muffins instead of dark chocolate cupcakes with strawberry buttercream.


Yep.

That's me.

Super duper health-conscious.

...

Ah, who am I kidding?  Next week I'll be back to my old tricks, I'm sure.

(In fact, today's post would have been very un-healthy, had a recipe I was working on not backfired on me!)

But in the meantime, we can all have a slight reprieve from my usual.

My landlord said these were some of the best blueberry muffins he had ever tasted (thank you, Warren!), so despite the 'healthier' take, I think you will still enjoy them :)

Blueberry Oat Muffins

1 C. old-fashioned oats
1 C. all-purpose flour
1/2 C. whole wheat flour
1/2 C. packed brown sugar
2 t. baking powder
1/2 t. baking soda
1/2 t. salt
1/4 t. ground nutmeg
1 large egg
1 C. + 2 T. low-fat buttermilk
1/4 C. canola oil
1 1/2 t. vanilla extract
2 C. blueberries, rinsed & dried
granulated sugar, for sprinkling (optional but recommended)

Preheat oven to 400°F. Spray 12-cup muffin pan with nonstick cooking spray, or line with paper liners.

Place oats in a food processor, and pulse until finely ground.  Add flours, brown sugar, baking powder and soda, salt, & nutmeg- pulse to combine.  Empty dry ingredients into a large bowl.

In small bowl, whisk egg, buttermilk, oil, and vanilla.  Add to flour mixture and stir just until flour is moistened.  Fold in berries.

Spoon batter into muffin-pan cups (I like to use a large cookie scoop to divide batter evenly) and sprinkle tops with a little granulated sugar.  Bake 23 to 25 minutes, or until toothpick inserted in center of muffins comes out clean. Cool briefly in pan, then transfer to wire rack; serve warm, or cool to serve later.  Makes 12 muffins.

Recipe Adapted from Delish (Originally from Good Housekeeping)

LinkWithin

Related Posts Plugin for WordPress, Blogger...