Sunday, May 30, 2010

Coconut Strawberry Banana Smoothie


So, it's Memorial Day Weekend and, at least where I live, that can only mean one thing...

...the official start of summer.

Which is something I used to get really excited for.  Warm weather, lots of time at the beach and in the sun, barbecues and corn on the cob, getting crazy with your friends, etc etc.

Now... not so much.

While I do still like all these things, (although at this point, 'getting crazy' means making it past 11PM and maybe throwing in a glass of wine) summer has become somewhat of a hassle.

For one, it seems like there's always a party or barbecue or wedding or some other type of shindig to go to.  Which is fun in the beginning, but usually gets pretty old by August.

Also, its awfully hot.  I can't spend all day in the sun anymore without getting cranky.  Plus within the past few years, I discovered this thing called sunscreen - which is great for preventing skin cancer, but very unhelpful when you are trying to get a tan.

I guess that means it's working.

Worst of all, there are tons of tourists & day-trippers around, which also means lots & lots of TRAFFIC.

(In case you don't know, I live a couple miles from the beach at the Jersey Shore - except, unlike good old Snookie and JWowwwwww, I acually grew up here.) 

After so many years of living at the beach (I went to college in a touristy area of Florida as well), I guess maybe all the hubbub is starting to get to me?  I mean, it's only Day 2 and I'm already complaining!  

I know, I know.  Most people would kill to live a couple miles from the beach. 

Maybe I just woke up on the wrong side of the bed or something today.

But what did make me feel better was this smoothie that I made for breakfast.

All the best parts of summer without the any of the hassle :)

Coconut Strawberry Banana Smoothie
  • 1/2 C. coconut milk (unsweetened)
  • 1/2 C. regular milk (skim, lowfat, whole- whatever you have is fine)
  • 5 large strawberries, hulled*
  • 1/2 banana
  • 2-3 T. sugar (depending on how sweet you like it)
Place all ingredients in a blender and blend until liquefied.  Makes one smoothie.

*Tip: You can use frozen strawberries instead, if you like your smoothies to be icy.

Original Recipe

Tuesday, May 25, 2010

Spicy Tomato Sauce


Italian-Americans do not mess around when it comes to tomato sauce.

Or food in general, really.

My family is no different.  So before we get to the "vittles," here's a "bit" for you.

Shortly before our wedding, my grandmother Yaya Vittles had an unfortunate accident where she broke her hip... and within a matter of days, her body went into complete shut-down mode.

Things were looking pretty grim, so all her close family members were called to say their goodbyes.  Mr. V and I drove the three hours to see her in the hospital, and I was beside myself to see her slipping in and out of consciousness. 

However, while my dad and stepmom were visiting, she managed to bring some comic relief to an otherwise dreadful situation.

She was having a 'dream' where she was apparently home in her kitchen, making Sunday supper, and she barked out orders to my grandfather in her sleep.

"Pop, get the tomatoes!" she exclaimed.

Then, "I'm making the meatballs!" as she massaged the air with her hands, mixing the imaginary beef and bread crumbs.

Now that's what I like to call dedication.

Thankfully, she was right when she told me that "they can't kill an old horse."  Over eight months later, she is still going strong.  And... still pumping out the meatballs and sauce. 

But despite following her "recipe," mine never comes out as good as hers :( 

So I took the best elements from her sauce, as well as the best from another one of my favorites (Pappy V's) and merged them into my own glorious creation.

My dad makes a quick, spicy sauce where my grandmother makes a slow, mild sauce.

I ... make a slow, spicy sauce.

And not to toot my own horn or anything....

But it's awesome.

Mr. Vittles, who does not even really like pasta and sauce, also happens to think it's awesome.

Toot toot.

Let's hope you agree.

Spicy Tomato Sauce
  • 3 T. olive oil
  • 3-4 cloves chopped garlic
  • 1 t. crushed red pepper*
  • 6 oz. can tomato paste
  • 1/2 C. red wine
  • 1 C. water
  • 2 T. Worcestershire sauce
  • 2 28-oz. cans crushed tomatoes
  • 2 T. dried parsley
  • 1 T. dried basil
  • 2 heaping t. black pepper
  • 1 heaping t. salt
  • 1/2 t. onion powder
  • 1/4 t. garlic powder
In a large pot, heat the olive oil on medium-low.  Add garlic and crushed red pepper.  Oil should be hot enough for garlic to sizzle a bit, but not too hot that it burns.  Brown garlic slightly until fragrant, 1-2 minutes.

Add water, wine, Worcestershire sauce, and tomato paste and stir until heated thoroughly.  Add parsley, basil, salt, pepper, garlic & onion powders, and crushed tomatoes. Stir to combine.  Bring sauce to a boil, then reduce heat to low.

Simmer on low for about an hour, stirring occasionally.  Serve with pasta, or use in place of jarred sauce in your favorite recipes.  Makes about 2 quarts.

*Note: Depending on how spicy you like it, you can use more or less red pepper.  The one teaspoon here gives it a pretty good kick, so I'd try that first before using more.  However, I would not recommend omitting it altogether unless you are adding meat to the sauce, which will give it some extra flavor. 

Original Recipe

Saturday, May 22, 2010

Lemon Sablés

In case you couldn't tell by my last post, I needed a few days to recover from the excitement of the brunch.
After all the planning and baking and hosting of party guests and house guests alike, I needed a little time to unwind and get my thoughts (and my tiny house) back in order.
Not to mention, things are unusually chaotic at work because we are moving to a new office on Monday.  So we've been cleaning and packing and sorting through old paperwork, and we all ventured to the new office to scope out our new workspaces.
Which, for me only, will be not 15 feet from the men's toilet.
Yes, that's right - the actual porcelain fixture is only that far from my desk. I have not the protection of even a stall nor a cubicle wall to shield me from the smells and sounds I can only imagine will be emerging from that dreadful room.
Naturally, I asked if something could be done, but it seems my fate is sealed. 
So I will look on the bright side. 
My desk is not in the men's bathroom.
And ... I have another brunch dessert recipe to share with you that turned out fabulously.
I actually first heard of sablés (pronounced "sah-BLEHs") in Home Ec back in high school - in case you're not familiar, they are just French butter cookies. 

But in Home Ec, I seem to remember making both a chocolate and vanilla dough and forming them into checkerboards that looked something like this:

Copyright 2008 BakingObsession.com

I also remember them being very boring and waaaay more trouble than they were worth, thus vowing never to make a sablé again for the rest of my days. 

However, this recipe intrigued me and I decided to give them another shot.  I'm happy to report that, with the addition of lemon and coarse sugar, these are not boring at all.  And in comparison to crafting checkboards out of dough, this recipe was a breeze.  (Chilling the dough logs and rolling them in sugar is well worth the extra effort when you see how beautiful and buttery and delicious these will turn out.)

Which says a lot coming from me, because I'm usually not a fruity-dessert kinda gal.  Mr. V liked them too!

So... let's all just be happy that our desks are not in the men's bathroom, and indulge on some lemon sah-BLEHs.

Lemon Sablés

  • 1 cup (2 sticks) butter, at room temperature
  • Zest of two lemons
  • 1 t. fresh lemon juice
  • 1/2 cup granulated sugar
  • 1/4 cup confectioners' sugar
  • 1/4 teaspoon fine sea salt
  • 3 egg yolks
  • 2 cups all-purpose flour
  • Sanding sugar or other coarse decorative sugar
Mix the sugars in a small bowl and add the lemon zest. Rub the zest into the sugar with your fingertips until the sugar is moist and fragrant with lemon with the bits of zest evenly distributed throughout the sugar. Set aside.
In a standing mixer fitted with a paddle attachment, beat the butter at medium speed until it is soft and creamy-looking. Beat in the lemon sugar just until the mixture looks smooth again, being careful not to let it get fluffy.

Scrape the sides and bottom of the bowl and beat in just two of the egg yolks, mixing until well-blended.  Turn the mixer to low and stir in the flour until it is fully incorporated. The dough will be very soft and not quite clear the sides of the bowl. Turn the dough out onto a work surface and divide it in half.

Shape each dough half into a even log about nine inches long and wrap each log in a sheet of plastic wrap (the plastic wrap can also help the dough-shaping process along if your dough is especially soft and sticky). Refrigerate for at least three hours or up to a few days if making ahead.

When you're ready to bake, preheat the oven to 350 degrees. Line two baking sheets with parchment paper or silicone baking mats. Using a pastry brush, coat each log of dough with the remaining egg yolk, and coat liberally in decorative sugar.
 
Slice each log into 24 discs (most easily achieved by slicing the log in half, then each half in half, etc.) and place on the prepared baking sheets. Bake for 15 to 20 minutes, until the edges turn golden brown and the cookies are mostly firm to the touch.  (Keep an eye on these from about 12 minutes on, as they can go from raw-looking to very crispy in a short period of time!)  Cool on the baking sheets for one minute then transfer to wire racks to cool completely.
 
 
Recipe Adapted from Piece of Cake blog

Tuesday, May 18, 2010

Doctoring a Cake Mix and Cupcake Frostings


Sometimes... you have no choice but to take a baking shortcut.

In my opinion, single-handedly making five types of desserts for 45 people, over a span of 2 days, calls for a shortcut or two.

For my brunch in honor of Momma Vittles, I decided that I wanted to make mini vanilla cupcakes - but I didn't want to take the time to make the batter from scratch so I doctored up a cake mix.

Multiple people at the brunch asked me for the recipe because they were so "moist" and "wonderful".  I wasn't embarrassed to admit it was a mix that I just fixed up a bit, and they asked me to put the shortcut here on V&B.  (Which, by the way, made me so happy that people are reading it!)

So, here is my tip: Substitute 1 cup of buttermilk for the water in the recipe.  If you're using a white cake to make vanilla cupcakes, add a teaspoon of pure vanilla extract to boost the real vanilla flavor.  Follow the rest of the recipe as it is on the box.

But since this isn't technically a recipe and I don't want to cheat you all, I will also share a couple of recipes for a vanilla frosting and a chocolate sour cream frosting that you can use to pipe onto your cupcakes.  I just think that for cupcakes, it looks so much cuter when you can pipe the icing on rather than spread it on!


So these two frostings are both conducive to holding the shape of a decorator's tip.  The vanilla one is so light and fluffy, it almost tastes like whipped cream.  And the chocolate one is rich with just a hint of tang from the sour cream and cream cheese.


Vanilla Frosting
  • 3 T flour
  • 1/2 C. milk (whole milk is best, but you can use lower fat versions as well)
  • 1/2 C. real butter (one stick)
  • 1/2 C. granulated sugar  
  • 1 t. vanilla extract
Whisk together the flour and the milk in a small saucepan on medium heat.  Continue whisking until mixture starts to thicken and it looks like smooth, shiny pudding (you should be able to see the bottom of the pan when you stir it).  Once it hits this point, promptly remove it from the stove and immediately empty it into a mesh strainer set over a bowl.  The mixture will be thick, but you can whisk within the strainer and also use the back of a spatula to push it through (you just don't want any residual flour lumps to go into the mixer.)

Let mixture cool to room temperature (you can chill in fridge to speed this up).  Just make sure it's cooled completely, otherwise it will melt the butter and you'll have runny frosting!

In an electric stand mixer fitted with the whisk attachment, beat the butter and sugar for a minute or two until well-combined and fluffy.  Then while beating, add in thickened milk mixture and the vanilla.  Beat on the highest speed you can for 7-8 minutes.  It will start out looking like a mess but I promise after being mixed that long it will turn out smooth and fluffy.

Spread or pipe onto cupcakes using pastry bag fitted with decorating tip.  I was able to pipe a dollop onto about 60 mini cupcakes with some leftover (as shown in the above pictures) but depending on how much you use, you could frost anywhere from 12-24 regular sized cupcakes.
    Recipe from Our Best Bites blog

    ~

    Chocolate Sour Cream Frosting
    • 7 oz bittersweet chocolate, coarsely chopped
    • 4 oz. cream cheese, at room temperature
    • 4 T. butter, at room temperature
    • 1 1/2 cups confectioners’ sugar, sifted
    • 3 T. unsweetened Dutch-process cocoa powder
    • Pinch of salt
    • 1/2 cup sour cream
    Melt the chocolate in a microwave-safe bowl, heating at 15 second intervals and stirring after each heating.  Set aside to cool until just barely warm.  In the bowl of a stand mixer fitted with the paddle attachment, beat the cream cheese and butter on medium-high speed until pale and fluffy, about 3-4 minutes.  Gradually mix in the confectioners’ sugar, cocoa powder, and salt.  Beat in the melted and cooled chocolate and then the sour cream.  Continue beating until the mixture is smooth and well blended.  Frost cupcakes immediately.

    Recipe Adapted from Annie's Eats blog

    Tuesday, May 11, 2010

    Chili Lime Basmati Rice


    Recently, Mr. Vittles' aunt Michelle Vittles was kind enough to share a recipe from one of her favorite cookbooks called "Lemon Spiked Basmati Rice."

    This recipe sounded awesome, but I can't help but get a little nervous when I see "rice" in the title of a recipe.

    Now here's a confession that's probably more embarrassing to me than being afraid of moths (which are vile creatures and I don't know why everyone isn't afraid of them?)

    I can't cook rice.

    I don't know what it is about the preparation of this silly grain that eludes me after all my time in the kitchen.  But somehow it either comes out too wet, or gets stuck to the bottom of the pan.

    Or then there's my favorite scenario- where it comes out too wet ... and then I get impatient because it was timed perfectly with the rest of my meal which is now getting cold ... so I blast the heat to speed things up and end up burning it to the bottom of the pan.

    Argh!!

    I've tried rice all different ways, with all different cooking times and ratios of rice to water, yet somehow it comes out wrong 99% of the time. 

    Nonetheless, I read on when I got this recipe and saw something miraculous - while the initial cooking is done on the stove, the rice itself is cooked in the oven.

    This I had never tried.

    So of course I had to give it a shot.  But I was making it to go with a Mexican dish, so I decided to switch things up a bit and use lime instead of lemon, chili powder instead of cayenne, and add some fresh cilantro.

    I even cut the onions!

    And let me tell you something.

    I can do this.  It's amazing.  And it's delicious.

    Chili Lime Basmati Rice
    • 1 C. basmati rice, rinsed & well drained (uncooked)
    • 3 T. butter
    • 3/4 C. onion, diced to about 1/4"
    • 1 1/2 t. minced garlic
    • 1/2 t. chili powder
    • 1 T. fresh lime juice
    • 1 1 /2 t. minced lime zest
    • 2 T. cream (or milk)
    • 1 1/4 t. salt
    • 1 T. chopped fresh cilantro
    • 2 T. thinly sliced chives
    Preheat oven 375 degrees.

    Place well drained rice in a 1 1/2 quart baking dish.

    Melt the butter in a nonstick or heavy saucepan.  Add onion & saute over medium heat until soft, about 2 minutes.  Add garlic and cook for about 30 seconds.

    Add chili powder, lime juice, lime zest, cream, salt, and 1 1/2 C. water - bring to boil.

    Stir entire mixture into the rice in baking dish.  Seal tightly with foil and bake for 20-25 minutes or until rice is tender & all liquid is absorbed.

    Fluff with a fork, then fold in chives & cilantro before serving.

    Recipe Adapted from Dishing with Kathy Casey

    Thursday, May 6, 2010

    Strawberry Shortcake Cookies


    This Sunday is Mother's Day.

    Last year on Mother's Day, I went to a flea market with my mom, and we picked out plants for her garden and my deck.  Then we went back to my house and I cooked breakfast for her and my stepdad.

    Now this is my first Mother's Day in 27 years without my mom, and all I have left of her are these memories.

      Me & Momma Vittles - Mother's Day 1986

    I am thankful to have an amazing stepmother and mother-in-law to celebrate with, but I would do anything to celebrate with her too.

    So if you have a mother (and/or mother-figure) in your life, I hope you let her know how special she is to you every single time you have the opportunity.

    Don't wait for a special occasion. You never know what tomorrow might bring.

    But Mother's Day is the prime time to show her that she means the world to you, so don't drop the ball on this one.

    Tell her how proud you are to have her as your mother.

    Tell her you're sorry for all the times you were god-awful to her (I don't care how awesome you are now - you were god-awful to your mother at some point in your life.)

    Tell her how much you appreciate everything she's done for you, and all the sacrifices she's made for you.

    Tell her how happy you are to have her in your life.  

    Just tell her you love her.

    And these cookies might help get your point across.


    Strawberry Shortcake Cookie
    • 12 ounces strawberries, hulled & cut into 1/4" dice (2 C.)
    • 1 teaspoon fresh lemon juice
    • 1/2 cup plus 1 tablespoon granulated sugar
    • 2 cups all-purpose flour
    • 2 teaspoons baking powder
    • 1/2 teaspoon coarse salt
    • 3 ounces (6 tablespoons) cold unsalted butter, cut into small pieces
    • 2/3 cup light cream
    • Sanding sugar, for sprinkling

    Preheat oven to 375 degrees & line baking sheets with parchment paper.  Combine strawberries, lemon juice, and 2 tablespoons granulated sugar.

    In a separate large bowl, whisk together flour, baking powder, salt, and remaining 7 tablespoons granulated sugar.  Cut in the cold butter with a pastry cutter, or rub in with your fingers, until mixture resembles coarse crumbs.

    Stir in cream until dough starts to come together, then stir in strawberry mixture.

    Using a 1 1/2-inch ice cream scoop or a tablespoon, drop dough onto baking sheets spacing evenly apart & sprinkle with sanding sugar.

    Bake until golden brown, 18-22 minutes. (Monitor carefully towards the end). Transfer to wire rack & let cool.

    Cookies are best served immediately, but can be stored in an airtight container at room temperature for up to 1 day.


    Recipe Adapted from Martha Stewart Living, June 2009

    Tuesday, May 4, 2010

    Oven-Crisp Black Bean Flautas


    So I think I already made it clear that I was a horribly picky eater as a kid.

    And while I got a little better with each passing year, it wasn't until I went to college that I truly broadened my culinary horizons.

    Part of the reason for that was the fact that my two best friends there were both vegetarians.  Nat and Flav Vittles taught me that tofu can actually be delicious (except when its in the form of a Thanksgiving "tofurky"...ick!) and that you don't have to have meat to have a meal.

    Not that this was totally news to me, or that I was some kind of meat freak before.  However, it did make me think outside the box and adapt some of my go-to recipes to be more vegetarian friendly.

    You know, eggplant parm instead of chicken parm... meatless chili... Italian wedding soup minus the mini meatballs, and with VEGETABLE broth instead of chicken broth (yes I made that mistake, unfortunately.)

    But I have especially embraced vegetarian Mexican by replacing chicken and beef with black beans. 

    Oh my.  Let's talk about black beans.

    Not only are they super tasty, they are also full of good-for-you things like fiber and protein.  And usually my favorite foods are not very healthy, so this is a welcome change for me :)

    Now thankfully Mr. Vittles enjoys black beans as much as I do...  Although I don't really enjoy the after-effects of black beans when it comes to Mr. V, if you catch my drift.

    Sadly, I often catch a drift as well.  Eww.

    But anyway, we eat a lot of Mexican around here and I get sick of making everything with chicken and beef.

    Or... sometimes I'm just out of meat and I'm too lazy to go to the grocery store :)

    Which was the case when I got inspired the other night to try my hand at making flautas.  So, I was on the hunt not only for a meatless recipe, but also one that could be baked instead of fried (as we have not eaten so great the past few days).

    My search led me to vegetariantimes.com (which seems like a pretty cool website, by the way) where I found a recipe for 
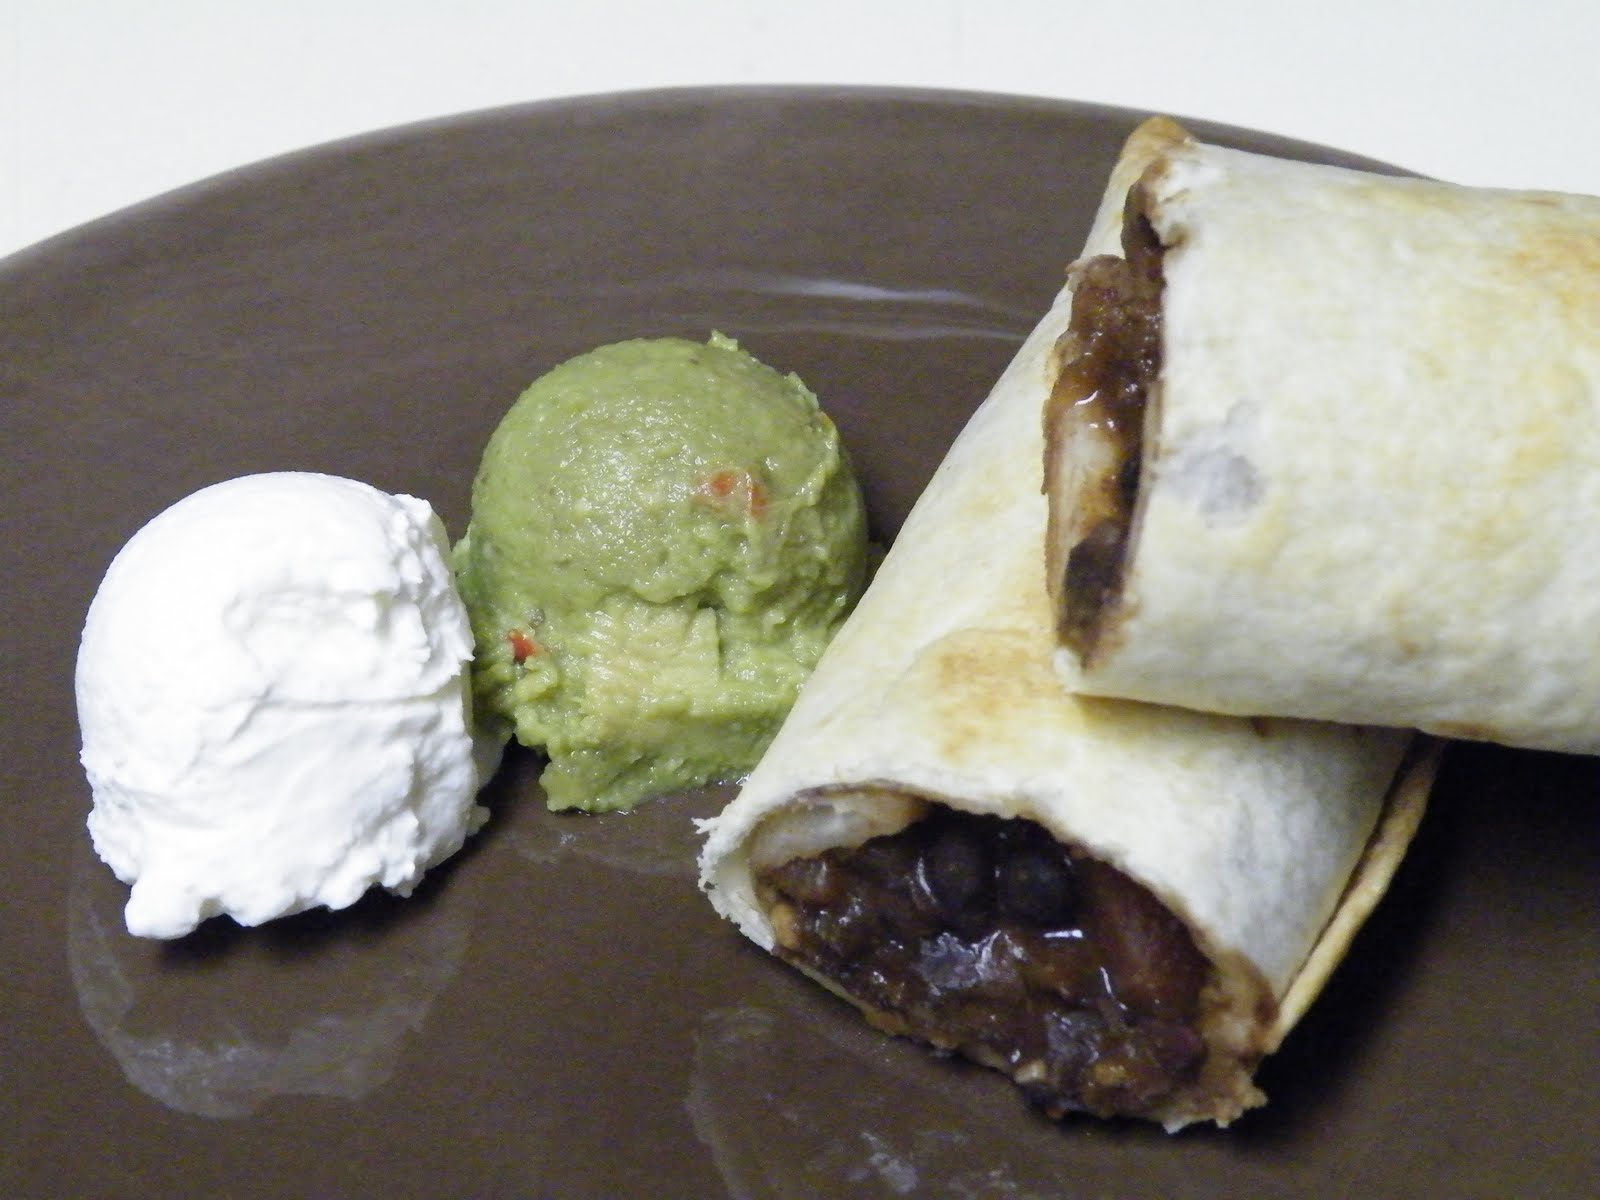
Oven-Crisp Black Bean Flautas.

    Bingo!  And just in time for Cinco de Mayo :)

    But of course, I couldn't let the recipe be too healthy.  So I took out the corn (didn't have any of that either), added a little shredded cheese & salt, and lightly brushed the tops of the flautas with canola oil before baking.

    Don't you dare try to burst my 'healthy' bubble, people.  At least I'm not frying them in 1/4 inch of oil!

    Anyway, since it's just the two of us and I didn't think these would be great as leftovers, I halved the recipe.  It made 5 flautas for me, but I like to load in the filling so you could probably make 6 if you're frugal.


    Also, just a general FYI for you - I often substitute onion powder for minced onions because onions do very bad things to my eyes and sinuses!  I know it's not uncommon to get teary when cutting onions, but trust me when I say I am more sensitive to the little devils than most.  I'm surprised I haven't lost a finger yet.

    Well, let's not lie, that's partially due to my klutziness :(  But seriously, my eyeballs & onions are just not friends.

    So ... I generally try to avoid them, unless they are one of the main features of the recipe (ie Fresh Pico de Gallo Salsa).

    But if you prefer fresh (or if you have these sweet onion cutting goggles & can chop away unaffected!) then you can mince half a medium onion instead of using the powder, and cook it along with the garlic.

    Oven-Crisp Black Bean Flautas
    • 1 t. olive oil
    • 1 clove garlic, minced
    • 1 15 oz. can black beans, rinsed & drained
    • 1/2 t. onion powder
    • 1 t. chili powder
    • 1 T. chopped fresh cilantro
    • 1 10 oz. can mild Rotel diced tomatoes & chiles, drained
    • 1/4 t. salt
    • 1/2 C. Monterey Jack cheese (or whatever type you prefer)
    • 5 10" flour tortillas
    • canola oil, for brushing
    Heat oil in skillet over medium heat.  Add garlic and cook about 1 minute until fragrant.

    Add 1/2 C. water along with beans, onion powder, chili powder and cilantro.  Reduce heat to medium low and simmer about 10 minutes until most of water is evaporated.

    Remove pan from heat and smash beans with back of spoon or immersion blender until mixture is thickened but still chunky, with some whole beans left.  Stir in salt & Rotel, and allow mixture to cool.

    Preheat oven to 425 degrees.  Coat baking sheet with cooking spray, or line with nonstick foil.

    Microwave tortillas in 10 second intervals until soft & pliable.  Spoon a heaping 1/3 C. mixture in a line down center of each tortilla and sprinkle cheese on top.

    Fold in sides on either end of the line, and then roll tortilla tightly around filling.  Secure end with a toothpick and set on baking sheet with seam side down.

    Using a pastry brush, lightly brush the tops of the flautas with oil and place baking sheet in oven until crisp, about 10 minutes.  Serve with guacamole, sour cream, and/or salsa.  (I would also recommend cutting them in half to let them cool... the filling stays really hot in the enclosed tortilla!)

    Recipe Adapted from Vegetarian Times

    Sunday, May 2, 2010

    Ricotta Cookies


    This post is dedicated to my husband's uncle, Carl Vittles.

    When I first started this blog a little over a month ago, he was not only very supportive but very excited.  And when I saw him yesterday at a 50th birthday party for another uncle, he informed me that he was anxiously awaiting a post about his favorite cookies - ricotta cookies.

    Which was very convenient, since I had made just them for this very celebration!  They are a very simple & soft white cookie that everyone seems to enjoy.


    Now let me just explain that no one in Mr. Vittles' family is Italian.  So when I first brought these cookies to a family function, they got some strange looks.

    If you're not Italian, you may not be familiar with dessert items made from ricotta cheese...  it's not just for lasagne & baked ziti, people!

    I also think I had to repeat the name of these cookies about 20 times that night.  My family says ricotta something like "re-GOA-ta" (not totally it, but close enough) where pretty much everyone else pronounces it like it's spelled.

    I don't know why, it's just a thing with Italians. You know, like "mozzarella" verses "MOOTZ-a-rell."  Especially when you're referring to the fresh variety.

    If I ever said 'fresh mozzarella' I think I'd be disowned.

    Anyway, it seems the deliciousness of the ricotta cookies broke the 'language barrier', and they've become a new family favorite.  Which says a lot, because there are a lot of talented bakers with wonderful recipes in this family!

    But Mr. Vittles and my stepdad could both single-handedly mow through a batch in a matter of days.  And at the party last night, the only thing left on the platter was some crumbs and a few rogue sprinkles.

    So this one's for you, Carl V - enjoy :)

    Ricotta Cookies
    • 2 C. sugar
    • 1 C. butter, softened
    • 2 C. ricotta cheese
    • 2 t. vanilla extract
    • 2 eggs
    • 4 C. flour
    • 2 T. baking powder
    • 1 t. salt
    • 1 1/2 C. powdered sugar
    • 3 T. milk
    • 1 t. vanilla extract
    Preheat oven 350.  On low, beat butter & sugar until blended.  Then increase speed to high and beat until light & fluffy (about 5 more minutes).

    On medium, beat in ricotta, vanilla & eggs until combined.

    Reduce speed to low & add flour, baking powder & salt.  Beat until dough forms. 

    One tablespoon at a time, either drop cookies onto greased sheet or form them into balls.  (Balls are a little easier to ice later because they don't have pointy edges).

    Bake 12-15 minutes until lightly golden.  Cookies will be soft.

    Cool completely on rack.

    Prepare icing by combining powdered sugar, milk and vanilla until smooth.  Food coloring can be added to glaze if you prefer colored icing.

    Glaze cookies, and decorate with sprinkles if desired.  Put back on rack to dry.

    Recipe Origin Unknown

    LinkWithin

    Related Posts Plugin for WordPress, Blogger...